Monday, 12 December 2011
12 Cards of Christmas T!m Holtz Style Card 6
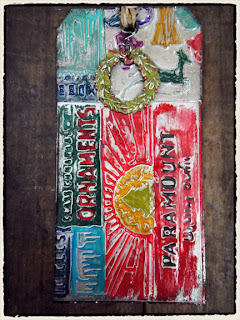
Ok so here we are at the finish of the first half of the 12 cards for me. I will say right now I am not a fan of the ornament on this card so will be changing it at some point! lol. But firstly I want to finish the next 6 cards. cannot believe I am half way or that tonight is the last tag! Anyways, here is the inspiration behind this card, T!ms tag 6.
I had a few different ideas on how to do the background but nothing was working so with a lot of playing i think I ended up with something pretty cool :).
Card 6
I cut a coke can to give me a sheet of metal as I don't have any sticky back metal sheets or anything like that. If you are going to use a drink can be very careful as the edges are very sharp!
I grabbed my Ornaments Sizzix texture plate. I made my sandwich with a couple of extra shims for a deep emboss. To get a deeper emboss I have found it best to layer in this way. Texture plate, Silicon Shim, cardstock shim/s then top plate from sizzix start kit.
I grabbed paint dabbers in a vast array of colours. I started by adding a different colour on and slightly around each ornament. I was going to try and use cotton tips to remove the excess paint from around the ornaments. This was an epic fail because of how the die was designed. So I ended up covering the whole thing in colour. just blobs of the different colours from the ornaments til there was no silver showing through. Basically I made the colours of the ornaments reach out and touch.
After letting the paint dry I grabbed alcohol inks in Snow Cap, Cranberry and Bottle and covered the entire thing. I didn't use the gold... Not sure why I put it in the picture lol.
I grabbed my heidi swapp sand paper and got to work! I sanded over the ornaments to bring them to life and show the lovely colours underneath. I also sanded the paint and ink away to show the metal around the edges. Don't add too much pressure when sanding when you only want to take the top layer off, took me a few mins to get a nice pressure but better to start too soft than rip all the paint off on your first swipe!
I grabbed some dark purple cardstock and trimmed it to card matting size. I distress the edges with my distress tool.
Now if you are like me you rush ahead wwithout thinking what elements you are going to add to your card. So I used glossy accents to stick my metal sheet to my card matt then double sided tape to stick to my white card base, which I coloured the edges of with Purple Twilight paint dabber.
Now i decided to add a dangling ornament... Haha I already stuck everything down. I had to carefully peel up a little of the top edge of the metal and pierce it with my piercing tool.
I used my ecraft to cut another ornament out and my Sizzix Teturz Candy Cane plate and ran the ornament through the cuttlebug.
I grabbed a zig glue pen and followed the lines to fill every second line with purple glitter, I did the same again (rather impatiently oops!) and used blue glitter. If you are going to do this don't be like me! Wait til the first lot of glitter dries first lol.
I used two silver jump rings and some chain to add the ornament to the front of the card.
Another finished card. As I said though not happy with the finish of this one so I will make a new ornament in the dark purple of the matt and just add glitter to one set of stripes or maybe even Stickles to make life a little less messy. In less that 24 hours I spilt water, dropped a pot of Multi-Medium Matte and knocked over a tall tube of blue glitter! Stickles seem the way to go! lol Will update this blog when I re-finish the card :).
Hope you like the background technique as that's the star of the show!
Happy Scrappin'
Purple
Subscribe to:
Post Comments (Atom)


Very very clever, you are excelling, keep 1 for me please.
ReplyDeleteYes Ma'am
ReplyDelete