blinkie

CraftyCrafter

Friday, 8 March 2013

Hero Arts Time to Stamp + Weathered Clock For A Fast Card


I stamped the  background for this card using Tea Dye Distress Ink. I chose tea dye becaue I don't use it very often lol. I used the Sizzix Tim Holtz Weathered Clock die with some Core'dinations Distress Kraft Core but not sure which colour the cs is lol (Wish they printed it on the back ;)). I think it looks like Vintage photo from pics online. I then sanded the clock and hands and added vintae photo diestres ink around the edges. 

From the same cream cs I  cut a medium size Lifestyle Crafts label from the labels set and inked the edges with my ink blending tool in tea dye followed by vintage photo. For some reason no matter hat I did I couldn't get it to look like the backgound lol. I stamped the clocks over the top with tea dye, They are very feint so they don't really show up in the pic, and misted with water because everything looked way to dark. I then stamped the Tim Holtz Sentiment from the Urban Chic Stampers Anonymous set with Tea Dye and embossed it with Ranger Superfine Clear Embossing powder.


I used a brown brad to put the clock hands together and then I used foam tape to raise both the sentiment and the hands up for some dimension. Oh and I adhered the clock with Multi-Medium Matte.
Happy Scrappin'
Purple

I am entering this at:
CAS-ual Friday - Stamped Background
613 Avenue - Tic Tac Toe - Die Cuts, Stamped Image and Free
Joyful Stamper - Anything Goes
Simon Says Stamp and Show - By The Numbers

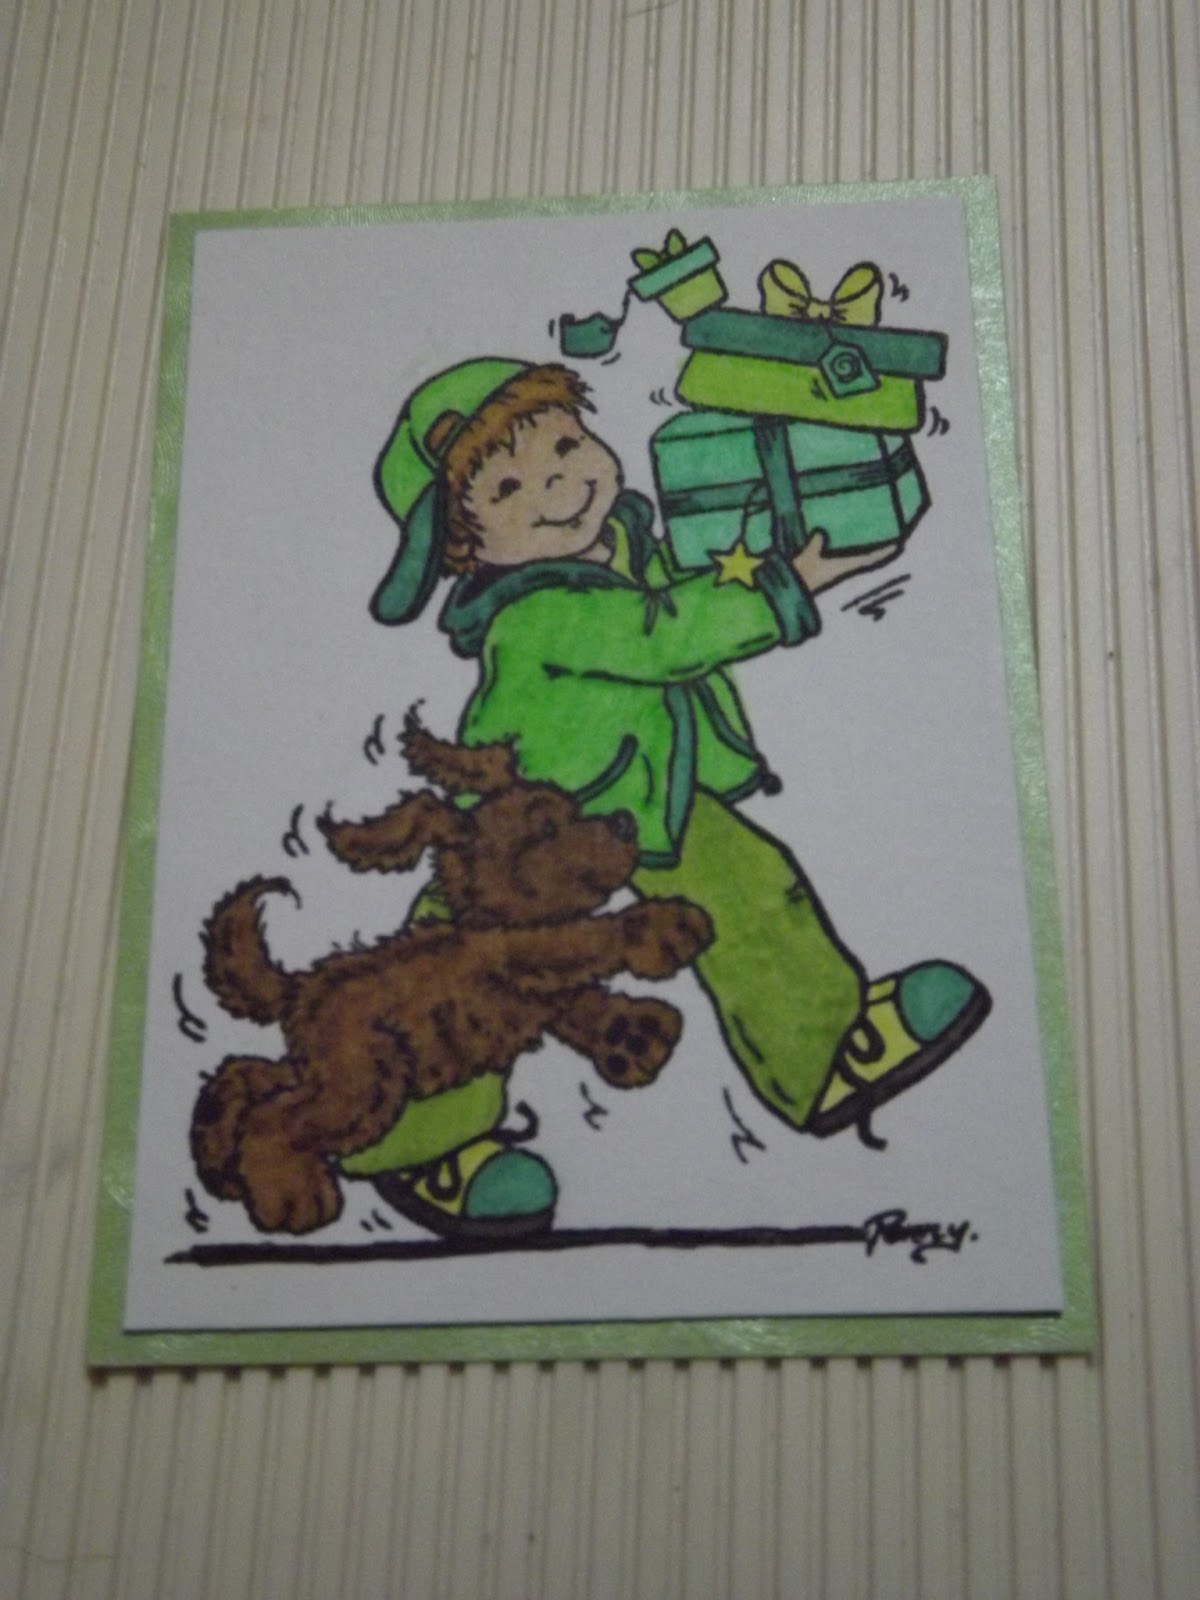
A Special Delivery In Shades of Green


I started off with this cute Penny Johnson stamp called A Special Delivery which I stamped in Jet Black Archival on Neenah Solar White cs.
He is coloured using greens and a hint of yellow in there for good measure lol. The colours I used are Green Gold #268 for his hair, Light Yellow Glaze #104 for his shoes, Leafy Green #112 for his jacket and hat, Dark Phthalo Green #264 for his jacket trim, hat bill and shoes, Light Green #171 for the teeny bit of his shirt that is showing and May Green #170 for his pants. His face is Light Flesh #132. I used the same colours for the presents with some Light Phthalo Green #162 added in as well. The puppy is coloured in Raw Umber #180. I coloured the dog using short strokes to try and add some texture to the dog, didn't quite work out though lol. Colouring is a huge learning curve!
For this background I used my stampamajig to position the Tim Holtz Stampers Anonymous numbers stamp from the Fairytale Frenzy set. I used my markers again (was wishing I had taken my Big Brush markers to my friends that day lol) to colour the stamp, then misted with water before stamping the first one. As I was using the pitt artists pens on a pretty hot day the ink dried out pretty fast on the first one. Thank goodness for my stampamajig! Had to stamp it three times lol. But I learnt after the first one colour fast and mist extra!
I mounted each layer onto some green swirly and shimmery cs  picked up from a local cheapy shop. Then mounted the whole lot on a white cs card base slightly smaller than the green as I liked how it looked without an extra white border. I actually coloured him twice as the first time the green went a little onto the yellow star. So I was going to cut a star and foam tape it but silly me stamped on the original image :( lol.
Happy Scrappin'
Purple

Monday, 4 March 2013

12 Tags of 2013 March


I have been a bit slack lately in doing the 12 tags, but this month I decided to give it a go even though I don't have most of the supplies Tim used lol. All good improvisation is my thing ;) First up I don't have the rabbit so I used my movers and shapers butterflies in the ornamental die from some DCWV paper. Then I edged it in some Frayed Burlap distress ink. Next instead of the sheet of tape I just laid strips of regular tape across my cs. I didn't have tinsel so I used wool for that soft fluffy feel. I learnt after covering the first butterfly to only take one strip of tape backing off at a time to keep it nice and sticky!


I don't have the tapered fringe die, but I do have the Martha Stewart Fringe Scissors so I grabbed some green Craft Core and got chopping. Then I sanded with my sanding block and added some frayed burlap. I made two layers this way.


From the same DCWV stack I grabbed a piece of paper to use as y background, as I had used a busy one around the butterflies I opted for one with a minimal pattern. The paper was no where near the colour I wanted so I added loads of ink around the edges. I started with Tumbled Glass followed by Broken China, Chipped Sapphire and finally Frayed Burlap for the grungy look.


Next I added some crinkle ribbon my sister got me as a present. It was pre-coloured so I just added some frayed burlap over the blue to tone it down a little. I tied the ribbon on and added that layer to the base with foam tape anywhere I could fit it around the woolly pieces and then added my "grass."


I don't have the metal foliage pieces so as I was doing a larger format than a tag I thought I would use a drink can (soda can) and cut it with the movers and shapers florals. I wasn't happy  with the size of one of the flowers so I cut some smallest ones from the tattered florals die. I used my fingers to shape each petal. For the smaller one I cut a small slit in between each petal first.


I don't have the new paints yet but they are so on my want list, right at the top! I used the Adirondack Dabbers instead. For the largest flower I used a combination of Pool, Aqua and Clover, the middle is Sunset Orange with white and the brad is Sunshine Yellow (I am in the middle of an argument with the yellow as it was almost solid!). 


For this flower I used a combination of Pink Sherbet and Aqua. and then the middle is the same as before. To turn the flowers into pins I added 2" pins to the back with glossy accents. I laid the pointy ends on a foam blending pad as a pillow to keep the pins in the right spot while they dried.


I cut the banner free hand as again I don't have the die. I stamped a flourish from Stampers Anonymous on the banner with tumbled glass. I then took my blending tool and used colours over the banner in the same order I did the outside piece. I stamped a sentiment from Mpress and then added some foam tape behind the middle part and double sided tape at the ends and stuck it at the top of my panel.


I then mounted the whole lot on a white card base the same size as the panel. I didn't want the card base to show so when I cut my panel I made it card front size (saves having to decide what colour card will be showing around the edges lol). Anyway that's my take on this months challenge, I hope you liked it :)
Happy Scrappin'
Purple

I am entering this at the following challenges;
Simon Says Stamp - Anything Goes
Joyful Stamper - Anything Goes
Tim Holtz - 12 Tags of 2013
Eclectic Ellapu - Child 
613 Avenue - Bingo - Brads/Free/Ribbon
Challenges 4 Everybody - Anything Goes
Make It Monday - Anything Goes

Sunday, 3 March 2013

Prima Nature Garden Milled Lavender Card


Just a little share first! I have been featured on the Joyful Stampers Inspire Me Fridays blog! Click Here to go see :) I am doing a happy dance! On to the card lol.

I really need to start working on my cards earlier lol. My clean and "simple" card turned into a nightmare when I kept killing my watercoloured image lol. I started with my card base. I used Neenah Solar White for this card. First time I have used this as a card base. I stamped the base with an Mpress Doily stamp set with Milled Lavender Distress Ink and built up from there lol . . .


On some watercolour paper I stamped the girl from Primas Nature Garden stamp set in Archival Jet Black. I coloured with a bunch of Distress Markers by using them on my Ranger Craft Sheet and then adding water to lighten the colour. I used my Tim Holtz waterbrush unfilled so I didn't over saturate the paper. The colours I used are Milled Lavender of course, Spun Sugar, Tattered Rose, Dried Marigold, Worn Lipstick, Vintage Photo, Brushed Corduroy, Scattered Straw, Antique Linen, Crushed Olive, Peeled Paint, Forest Moss and Pine Needles.


Next I searched for some cs to cut a Lifestyle Crafts Doily out of and then cut a small labels die out of the neenah cs and the medium one from watercolour paper. I used the large one from that set to cut my image out. I stamped the small label with another Mpress doily, then with a sentiment from the TPC Studio set Playful Expressions.I then edged it with some more milled lavender. With the medium label I used a cuttlebug folder to emboss it and then used milled lavender on it with my distress tool.


Next up I coloured some Hemptique white twine with the distress ink pad and my ink blending tool by repeatedly pulling the string between the pad and the tool til I got the desired colour. A great way to colour twine to perfectly suit a project. Just don't forget it dries lighter lol. I could hve cut a length first but I found it easier to hold on to the spool.


I stuck some double sided tape on the back of my image and used it to hold the twine in place while I wrapped it around three times and tied it off. I used my Crop-a-dile to set a small eyelet in my label with the sentiment and added three more pieces of twine to that.


I used Multi-Medium Matte to glue the doily down, foam tape on the image and the sentiment label and xpress it for the bottom label. I am learning more every time I colour :) I won this prima stamp set early last year and had yet to crack it open. Such a pretty image, I need to use it more!!!
Thanks for stopping bye.
Happy Scrappin'
Purple

I am entering this n the following challenges:
613 Avenue - Anything Goes
Make It Monday - Anything Goes
Simon Says Stamp - Stamps You Love But Don't Use
Love To Create - Wrap It Up / String/Twine/Fibre
Simon Says Stamp Challenge - Anything Goes
Moving Along With The Times - Lovely Lady
CAS-ual Friday - Stamped Background
Joyful Stamper - Anything Goes (where I am a featured artist this week yay!)
One Stop Craft Challenge - Mothers Day

Saturday, 2 March 2013

Another Hero Arts Watercolor Petals Card


When I stamped these flowers from the Hero Arts Watercolor Petalsfor the Simon Says Challenge in blue I decided to stamp them a couple more times as well. As you can see this time I stamped them in pink for a pink and black challenge. This time I used the Faber Castell-Big Brush Markers in Pink Madder Lake, Magenta, May Green and Chromium Green Opaque. I stamped first generation then misted with water for the second and third gen stamping. I used the Lifestyle Crafts Frame die in black cs to frame the image.


For the sentiment I used a butterfly stamp from the same stamp set coloured with the two pinks and Dark Sepia. This is a second gen stamping of the butterfly. I then Cut it out with a Lifestyle Crafts Labels Die and added Black Gelato around the edges and blended with a paintbrush. I aded more and bended with my finger. I decided I wanted  things to sparkle so at this point I started adding my home made shimmer spray to things lol. You can see a tiny bit  of shimmer  in the pics. I added a border around the label in the same pink as the base of the card and used foam tape on both layers.


In this pic you can see how under the label is a piece of pink cs I stamped with the watercolour butterfly using lightly misted black gelato. I only put gelato on the stamp twice to go round the whole mat piece, I just lightly misted after each stamping. I also added black gelato around the whole card base. The sentiment from inkadinkado is stamped with archival.


In this pic you can see how the ribbon I chose has an off whitish pattern on it. I wanted to change it up so I grabbed my big brush markers in the same colours I stamped my flowers and coloured them. You need to colour a section, heat set it and go over it again til you get the colours you like.


I decided I wanted to give this card to my mum for her birthday next month. I bought her two tickets to see The Seekers in May and wanted to add them into the card. So I made a little pocket to tuck them in to. I stamped the butterfly again using my markers onto pink cs to add to the pocket and misted it. As I was stamping on the pink cs this time I used Dark Sepia as the butterfly body colour. On the opposite side I stamped a Fiskars sentiment in archival.


I really hope she likes the card even though it is very pink lol. Her fave colour is red but I do remember growing up with her having pink bed spreads and things so should be all good!
Happy Scrappin'
Purple

I am entering this at:
Simon Says Stamp - Anything Goes
Make It Monday - Anything Goes
Make My Monday - Pink and Black
613 Avenue - Anything Goes/Pile It On
Crafty Cardmakers - Blooming Images
Moving Along With The Times - Lovely Ladies 
Joyful Stamper - Anything Goes 
One Stop Craft Challenge - Mothers Day