blinkie

CraftyCrafter

Showing posts with label tattered banners. Show all posts

Saturday, 26 April 2014

Sweet Treats Gate Fold Flip Card with A Little Whimsy


This time at Eclectic Ellapu the challenge is Birthday. I made this card for little miss's 10th birthday. I used KaiserCrafts Sweet Treats stack for all the papers. The card is a Gate Fold with a flip panel and a pocket.
 I started with a piece of A4 white cardstock. I used my Martha Stewart Scoreboard to work out where my folds needed to be and then cut the two unneeded portions off with scissors. I inked around all the edges inside and out with picked raspberries distress ink.
 I then chose two coordinating papers and cut panels for the card and inked around them as well.
 I coloured this whimsy stamp with watercolour but I forget which medium lol, it was a freebie from a magazine and is slightly smaller than the rubber mount version. I used my Lifestyle Crafts Nesting Circles and then from the same paper I used for the inside panels I cut a Spellbinders Butterfly Circle, again inking the edges with picked raspberries.
 Front panels before the image is added.
 I cut some tattered banners and used my blending tool to add some picked raspberries. I then stamped in picked raspberries as well.
 This is the flip panel before you lift it stamped with carious sentiments.
 The open flip panel with a more stamping and a quickly put together pocket for some money.
All finished with the Image and sentiments added with foam tape. I am thinking I used a combination of Derwent Inktense and Watercolour pencils but don't quote me!
Happy Scrappin'
Purple

Sunday, 16 March 2014

A Little Gelato Love with Fleur Botanique

Hi everyone. It's that time again, time to post a new card for Eclectic Ellapu. The theme this week is Butterflys and Flowers. I got this stamp free with a magazine from England... So glad it was in my local newsagent! I had to have this gorgeous stamp. The magazine is Cardmaking and Papercraft and it's from the Fleur Botanique collection..
I coloured the background using gelatos like a watercolour. The flowers are done in Guava and Bubblegum for the pink and Lavender and Grape for the purple. The leaves are Pistachio, Green Tea and Lime and the background is Metallic Mint.
I used a spellbinders nested scallop die for the next layer, for the pp I used a lavender gelato wash to give it a hint of purple and then I cut a white square to mat it all on before adding it to my pink star dream card base.
I then stamped some butterflys in archival ink and water coloured them with the gelatos. I couldn't decide if I wanted to stamp them with black or coloured archival, so I did both and then chose the black ones :)

I took some white I Am Roses and coloured them with the gelatos to match the flowers in the background. The colours came out much darker on the flowers though lol. I misted them with homemade shimmer mist for some sparkle.
Finally I used a Tattered Banner by Tim Holtz to add my sentiment which was actually part of a journal block and coloured just the part I wanted with Black Soot Distress Marker. I added some Guava Gelato to the edges and smudged it with my finger.
So that's my card for this weeks challenge :) It's Mothers Day in may and so I am going to give this to my mum :) Her colours are red and aqua so I hope she likes this anyway, Haha!
Happy Scrappin'
Purple

Tuesday, 18 February 2014

Belles and Whistles Pen Friend With KaiserCrafts Candy Lane

First off, sorry for the not so good pic, think my lens was a bit smudgy :( all the pics I have for this card are like it, siiiigh . . . Any how this card was for a young lady I knows birthday. I let her pick the stamp and the main colour theme.  The stamp is from Belles and Whistles and is called Pen Friend. I started by stamping the image onto Neenah Solar White cs as well as onto my marker pad so I could get an idea of colours that would work together.
And the I got to colouring with a bunch of Promarkers and Copics. As you can tell my lil friend loves hot pink, so does my daughter lol. I find it a challenge to work with so thank goodness for colour co-ordinated paper pads lol. I used the marker pad to help find a suitable blending family as you can see.
Lucky I did as the marker I used for the ribbon was extra juicy and a lil leaky lol. If I had used it right on my image I would have ruined it! I solved the problem by putting the fine tip on the promarker and using a very light stroke over the ribbons. I was very lucky when I took the tip off as ink went everywhere but on the image! lol
I went around the whole image with nice soft pink copics for a nice halo effect. Just so you can see how many colour I generally use on an image . . . Here ya go lol! Actually this bunch on the small side.
Next up I grabbed  bunch of spellbinders dies and began cutting my layers with my Ebosser. I used Labels Four to cut my image, I used a Timeless Rectangles die on the pink layer and a Floral Ovals die on the teapot layer.
I used foam tape behind my image and the pink layer for dimension as you can see from the shadows in the pic.
I then took a Fiskars stamp and two Tim Holtz Tattered Banners from Sizzix and stamped the sentiment. To do this I carefully inked up the one line at a time so I could put one on each banner. I used a baby wipe very carefully to remove any excess if I got it on the line I wasn't using at the time.
I added foam tape under the banner so it was in line with my 2nd raised layer, cut another co-ordinating piece of pp for my background and stuck it all to my card base :)
 Apologies again for the out of focus pics, hopefully I don't have any more like that! Anyhow time for me to get some shut eye so . . .
Happy Scrappin'
Purple

Saturday, 17 August 2013

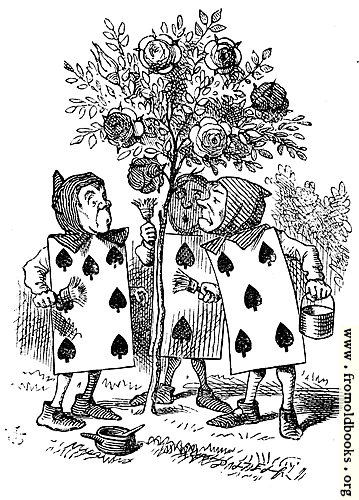
Painting The Roses Red with My New Copics!

So I was looking into getting alcohol markers . I bought some Promarkers and I really liked them so I bought another set (vivid and set 1) . The only problem was I didn't have many blendable colours . Then I bought a set of 30 old Trias someone was selling. This gave me a few pastel colours and some skin colours and also 30 fine nibs that also work on the Promarkers . I really love the streakless colouring. I have faber castells and could never get them to not streak so don't know what I was doing wrong! Anyway to cut this long story short I frequent ebay quite a bit and came across a seller in France who was selling a complete set of  Ciaos and Wides with a couple of sketches thrown in. They are barely used (they said they did 2 pictures) and still nice and juicy. So with my heart in my chest and waiting til the last minute to bid I nabbed them for less than 1/3 of the rrp :) Bargain lol. Then for my birthday a friend bought me the case for them :) All my copics and promarkers fit in it nicely at this stage although I am not sure if I will keep all the wides. Will see how I feel a bit down the track.
Anyway now that I am finished rambling about that I get to tell you that this weeks project for Eclectic Ellapu needs to contain playing cards :). So I scoured the net for an image I could use. I fell in love with one but thought $4 might be a lil much for a digi when you can get rubber for that price. So I kept looking. Originally I thought maybe I would do the Queen of Hearts from Alice in Wonderland but then I found some Free images at From Old Books. That links takes you directly to the page with the image I used but there are many many more :)
So now I have coloured this with a combination of copics and promarkers and am using an Xcut Ornate Frame die to cut it out in my Ebosser. Here is a list of colours I have used:
Roses, paintbrushes and Card 2; R27,  R29, E40, E41
Card 5; R59, RV69
Card 7; Promarkers Olive and Pear Green
Stockings;  E35, E33
Faces; E00, E01, E02, E93 (cheeks)
Tree; G99, G95, YG95
Grass and bush; YG63 YG67, Olive Green, G94, G28, YG91
Shadows on all cards; C5, C2, C0
Paint pots; C5, C3, Y21
Next I grabbed Cosmo Crickets 6"  Odds & Ends stack. I grabbed two co-ordinating pieces. The green stripey piece, the coloured image and the piece for iside the card were all cut using Xcuts Ornate Frames. I edged them with R29.
For the cream floral piece I used a Martha Stewart corner punch and my B000 for the edges. Argh my kitty is trying to help me type lol.
Next up I grabbed my Tim Holtz Tattered Banners Sizzix die to cut two banners the same size. I used white cs which I coloured with R29 to match the rest of the card.  The sentiments were printed out at the same time as the images. I cut around them then coloured them with B000, there was still some R29 on my fingers and it came off on the first one I coloured so I decided I best put some on the other one as well so they matched :). I added two layers of foam tape behind the middle of each banner after I taped the sentiments on.
For my base I used cream cs that I edged with R29 again. I used double sided tape to add my Cosmo Cricket papers and then a single layer of foam tape on my image. I then added the banners. I was in two minds as to whether or not to add flowers or not. But as you can see I have left it for now :)
Below are a couple of images I have coloured with my copics since I got them.
Not very good at hair yet that's why she isn't finished. I attempted hair on the second one as you can see :) also a mouth... Shoulda left it but live n learn hey?
The second picture here shows three different card stocks. Neenah Solar White and two I got from officeworks here in Australia. I have to say the cheaper two cardstocks performed way better than I thought they would. When I pull some more paper for my cupboard I will do a post on it and let you know the names of the brands :).
Thanks for Stopping by.
Happy Scrappin'
Purple

I am entering this at;
Simon Says Stamp - Die Cuts