I thought I would share a card I made for Valentines. Most of the work has been done by using Lifestyle Crafts heart shaped dies :)
My base was made by folding red cs and carefully lining up the fold with the top of the Nesting Lace Hearts die so that instead of getting two hearts I retained the fold. Next I cut a black Nesting Scallop Heart followed by a red Heart Doily (actually that die is what started this card :)) , an itty bitty Nesting Eyelet Heart and then a regular Nesting Heart.
I used some stamps but of course at this moment forget which brands lol, . . . I stamped the base layer and the top layer with Fired Brick distress ink. The sentiment was stamped with black archival. I coloured some I Am Roses with Dylusions and then sprayed them with home made shimmer spray.
I make the spray I use the most with Pearl-Ex in Macro Pearl, Micro Pearl and Pearl White. I have a 100ml bottle I use to make up the spray because I use it so much lol. I have to say I usually add double Macro Pearl because I love it's bling bling bling effect lol. As Pearl-Ex needs a binder added I usually start with warm water and add either Gum Arabic or or a feww drops of Glossy Accents and give it a good shake before adding any pearls.
I finished the card by adhering all the layers together with double sided tape, placing the flowers and adding some twizzles (the flower stems twisted around a paintbrush handle or an awl) and gluing them down with Glossy Accents. To finish off I added some Black Enamel Accents spots.
My only beef with the card is next time I make one I need to either have it open at the side or alter the direction of the stamping and element placement as this card opens to sit on the side . . . oops!
Anyways Thanks For stopping by :)
Happy Scrappin'
Purple
I am submitting this at;
Crafty Catz - Anything But a Square
Simon Says Stamp - Have a Heart
Make It Monday - Anything Goes
One Stop Craft Challenge - Anything Goes
Joyful Stamper - Inspire Me Fridays - Anything Goes
The Pink Elephant - Love is in the Air
Showing posts with label pearl ex. Show all posts
Thursday, 7 February 2013
Valentine Heart Card
Labels:
card,
die,
distress ink,
distress stain,
dylusions,
enamel accents,
glossy accents,
heart,
heart doily,
i am roses,
lace harts,
lifestyle crafts,
nesting,
pearl ex,
pearl pen,
scallop heart,
valentine
Sunday, 1 April 2012
Creative Chemistry 101 Day Nine
Second last day... Getting there :) Perfect pearls!
Anyone who knows me knows I love all things shiny. I have both pearl ex and perfect pearls lol and bling out the wazoo...
My spray mists are not made with reinker tsk tsk as I love using my colour wash for mists and tend to make up bigger batches, usually around 50ml as I use mists a lot.
I love this technique. How pretty it is :)
So I had to do it twice ;) lol
2nd generation
First Gen
Second Gen
It's really a balancing act between too much and not enough water. I completely washed one out with too much lol
But the result is so pretty I did two. . .
I would make the whole world sparkly if I could! just give me a giant glitter shaker and some wings!!! Hahaha. I will definitely be using these techniques again that's for sure :) There was one I hadn't tried before and now I have I likes it!! :)
Only one more day to upload. I finished that one just before writing up this post to post later lol...
Happy Scrappin'
Purple
Anyone who knows me knows I love all things shiny. I have both pearl ex and perfect pearls lol and bling out the wazoo...
My spray mists are not made with reinker tsk tsk as I love using my colour wash for mists and tend to make up bigger batches, usually around 50ml as I use mists a lot.
I love this technique. How pretty it is :)
So I had to do it twice ;) lol
2nd generation
First Gen
Second Gen
It's really a balancing act between too much and not enough water. I completely washed one out with too much lol
But the result is so pretty I did two. . .
I would make the whole world sparkly if I could! just give me a giant glitter shaker and some wings!!! Hahaha. I will definitely be using these techniques again that's for sure :) There was one I hadn't tried before and now I have I likes it!! :)
Only one more day to upload. I finished that one just before writing up this post to post later lol...
Happy Scrappin'
Purple
Wednesday, 8 February 2012
Papermania Midnight Fairytale Card
I recently saw these fairy stamps and fell in instant love with them! They are so pretty and great for colouring in with my Faber Castell Markers. they are Papermania Midnight Fairytale clear acrylic stamps.
I first stamped my image with Timber Brown Stazon. I chose brown as it softens into the image more, it's a less harsh look in my opinion.
I then coloured the image with both Faber Castell Pitt Artist Pens and Big Brush Markers. I used a couple of techniques. First I straight coloured my image. For some reason I always start with the skin. I used the artist pen for this. I found that if I did a small section then pulled/blended the colour down I ended up with less streaks.
Once I coloured all the skin and it was dry I then went back with the same colour and added shadows with the same marker.i used my finger to again pull the colour and blend it in. I worked in very small sections so the colour was still very wet when I blended. Her face is a little dark because I went over it two times. But it was late and this was my umpteenth go at colouring her in.
Because the dress is a large area I used a big brush marker for this section to minimise streaking, again blending as I went. I added shadows and the flower details with the same maker.
The rest is done with the pitt artist pens as most is fine detail work and my hands are just not steady enough to
colour these with the big brush markers.
The technique I used on her wings was to go over the stamped lines with my chosen colour one line at a time, then pull the colour down into the wings. This gives a nice translucent effect. After I fussy cut my fairy out I used home made glimmer glaze over the wings ( Reeves Iridescent medium, spritz of water, multi-medium gloss, spun sugar reinker).
On a white cs base I added polka dot paper from the KaiserCarft 6" Candly Lane stack. I then used a lovely floral stripe paper from the Authentique uncommon 6" stack that I had cut with my Lifestyle Crafts largest nesting frames die. I used foam tape to add my fairy onto this.
I then grabbed some I Am Roses flowers and coloured them with the two main shades of Faber castell markers I had used. I worked quickly, one flower at a time, to colour the edges and then mist with home made pearl mist (pearl ex on macro pearl, micro pearl and pearl white, water and a few drops of glossy accents).
I added my flowers to the card with glossy accents. I used the stems from some of the flowers to make twizzles to finish off the card.
Hope you like my card. thanks for looking :)
Happy Scrappin'
Purple
Labels:
authentique,
big brush markers,
distress reinker,
faber castell,
i am roses,
iamroses,
Kaiser,
kaisercraft,
midnight fairytale,
multi medium,
papermania,
pearl ex,
pitt artist pens,
stazon
Wednesday, 18 January 2012
Ok More Art Journalling Bursting Forth
So wow this is my fourth post today :)... I blogged the other week about showing some friends new techniques that they were not aware of or needed a refresher on. Most of it was to do with distress inks. But one was the toilet paper technique I saw on Creative Jump Start. Yes I have Truly Been Jump Started! lol...
So one of the main aims of my journal is to have a lot of the techniques I know or am learning in the one place as a point of reference. So I took my toilet paper piece I created that day and added it to my art journal! :)
I used Toilet paper 8 sheets To make the centre piece
Clock Texture Fade For the centre piece
Home made glimmer mist using Color Wash & Pearl Ex to spray both the centre piece and the background.
KaiserCraft Black & White Timeless For the clock
Lifestyle Craft Circle Die For the clock
Chipboard from a cereal box to make the clock sturdier and foam tape to add dimension.
Stampers Anonymous Tim Holtz Stamp To stamp the background with Worn Lipstick Distress Ink
A sharpie to write the words.
Brads for the clock centres and a clock charm and some chain to finish it off.
As I already had the toilet paper centre it really only took me 20 minutes or so to complete my page. Am really getting into this art journalling now it seems :)
Thanks for looking
Purple
So one of the main aims of my journal is to have a lot of the techniques I know or am learning in the one place as a point of reference. So I took my toilet paper piece I created that day and added it to my art journal! :)
I used Toilet paper 8 sheets To make the centre piece
Clock Texture Fade For the centre piece
Home made glimmer mist using Color Wash & Pearl Ex to spray both the centre piece and the background.
KaiserCraft Black & White Timeless For the clock
Lifestyle Craft Circle Die For the clock
Chipboard from a cereal box to make the clock sturdier and foam tape to add dimension.
Stampers Anonymous Tim Holtz Stamp To stamp the background with Worn Lipstick Distress Ink
A sharpie to write the words.
Brads for the clock centres and a clock charm and some chain to finish it off.
As I already had the toilet paper centre it really only took me 20 minutes or so to complete my page. Am really getting into this art journalling now it seems :)
Thanks for looking
Purple
Labels:
black and white timeless,
brads,
charm,
color wash,
distress ink,
home made glimmer mist,
Kaiser,
kaisercraft,
lifestyle crafts,
pearl ex,
sharpie,
stampers anonymous,
texture fades,
toilet paper
Wednesday, 28 December 2011
12 Cards of Christmas T!m Holtz Style Card 8
So here it is my favourite so far and the most labour intensive lol. This one took a good long while but it made it here in the end :). I love steampunk but the challenge for me was to change it up by using a different colour all together and yet still somehow get that christmas feel. I spent a whole hour trying to make a stamped shrink clock that I ended up putting aside as the colour didn't work lol... Definately a challenge! My Inspiration a la T!m.
Card 8
It started with a clock. That's the main element I wanted to add to my card. The challenge was how to make something spectacular with said clock.... lol. I cut my clock from the Sizzix Weathered Clock die and set it aside and got to work on my background.
I cut white card to size and covered it in Tumbled Glass Distress Stain. i dried it with my heat tool and the misted with home made mist. The mist is made from Denim Color Wash and True Blue Pearl-Ex. I added some cling Wrap over the top and scrunched. Ok I need to learn to walk away for a while and leave it alone lol.
This was the result... Sorry about the shadow but it has the best colour lol.
I grabbed the clock and covered it in Snow Cap Paint Dabber then went over it with Tumbled Glass Distress Stain. After that dried I added some more stain to get some more colour on there.
I then grabbed my Pearl Ex in Silver and my Perfect Pearl Brush and added some more colour on to the clock. In the end I also added a smidge of Faded Jeans to the clock as well.
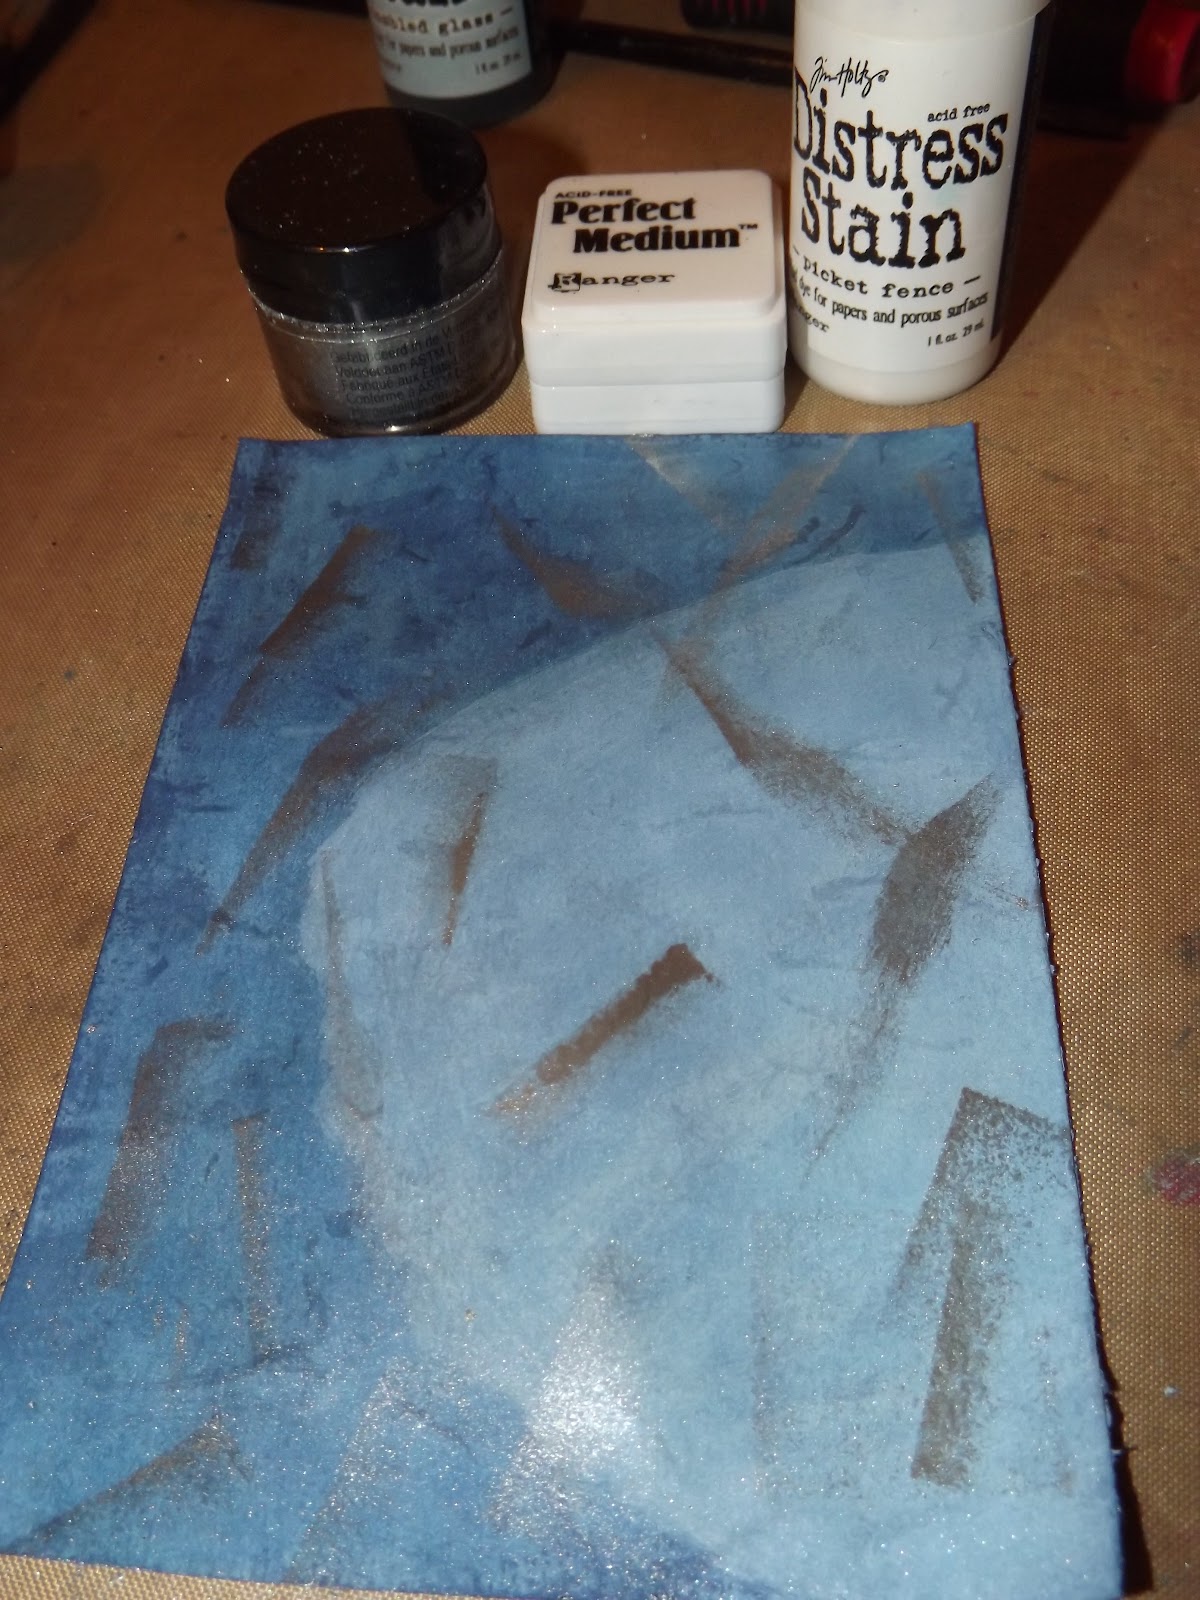
I tend to jump around from one place to the next when I am crafting so I grabbed my background and decided to give it a boost. I used Picket Fence Distress Stain to lighten a portion of it. I wasn't worried about the shape too much as I knew a lot would be covered over. I then took my Perfect Medium and used the pad edge directly on the page to add some lines. I went over that with Silver Pearl-Ex.
I grabbed a stamp from Flight's of Fancy and used tumbled glass to stamp some watermark type effects onto the background. As you can see it is very feint. I decided it was to feint later and added more :O...
I then grabbed a piece of blue marbled cardstock from my stash and stamped my sentiment with a Stampers Anonymous stamp. I used Faded Jeans Distress ink and quickly tossed some Ranger Ultra Fine Embossing Powder over the top and heat set. I then used a Lifestyle Crafts die and positioned over my stamp to try and make it even on each side. I used some Scotch Vellum Tape to hold the die in position as I ran it through the Cuttlebug.
I ran it through again with the Spellbinders Tan mat to give a little edge to custom die cut.
First up I used tumbled glass with my distress tool to edge my die cut, I then went round again and added faded jeans to the edge. On top of that in selected locations I dabbed on some silver pearl ex.
I cut a cog with my Gadget Gears die and then mixed white and Broken China Crackle paints together. I don't have tumbled glass so was the best I could do lol. Hmmm wonder if you can add reinker to white... lol. Might try that next time I need a colour I don't have....
I liberally painted my cog. I used all that paint :O, lol I thought I had made far too much, and set it aside to dry.
At this point I will say I got some shrinkies and polyshrink the other day and was playing around with them. I made a small cog with one using the medium gadget gears cog. I then used perfect medium all over and sprinkled light blue embossing powder over before heating and shrinking with my heat gun. Once it was cooled a lil I used some silver pearl ex to give some shine. Here is a pic of me trying it out on my card while the other cog was drying.
Here is where I added another layer to the background lol. Taking the same stamp as before I used my Picket Fence Distress stain direct to the stamp to add some lightness.
Once the crackled clock was dry I went over it with some denim distress ink and a make up wedge.
I wanted to use broken china distress pad but I don't have one. So I cut a square of Cut-n-Dry Foam and made my own temporary one til I get the pad lol. Easy peasy, Cut-n-dry and a few drops of reinker. Done! I will say don't add too much reinker a little goes a very long way... oops...
I used my custom ink pad to stamp a bird image and then embossed again with the super fine. I used a bigger lifestyle crafts die to fit around the bird. Again I used the spellbinders tan mat to emboss after I cut the shape. I stamped the diamond pattern using the custom pad. I stamped multiple times with the one inking to give the lighter effects.
I went around the edge with broken china and faded jeans. I then used mink pearl ex on the tree branch and added some blue russet pearl ex to the bird for a wing and to his belly as well for a christmassy look. I used a permanent marker to add a little eye.
I then grabbed that piece and the crackle cog from earlier and added some silver pearl ex around the edge of the die cut and all over the cog to give it some shimmer :)
I then spent aan hour making shrink clocks, til I made a perfect one... That I didn't end up using because it just didn't suit the card! That's ok it will find a home somewhere one day!
So then I cut a large cog out of shrinkies and shrunk it down with my heat tool. I went over it with perfect medium and then silver pearl-ex. I found the pointy tweezers in the pic on ebay in the nail art section. they are brilliant for bling and holding stuff when your heating! lol Love em!
Again I had another element I really wanted to put on this card but it wouldn't go lol...
Clean it off set it aside for another time... I should add that I found on the way to getting my daughter off the bus one day...
So then I grabbed some more of that gorgeous blue marbled cardstock and stamped a Christmas sentiment on there in tubmbled glass, threw some embossing powder over the top and embossed it :). Using the same method as before I positioned in a lifestyle crafts die and taped it down and ran it through the bug to cut and emboss. I then edged it with broken china and faded jeans.
Almost there... Phew this is a long one hey? lol...
Ok next up I decided I wanted to take it to the next level so I grabbed the bird die cut shape and flipped it over. I used a lil' davis journalling stamp on the back, then used my crop-a-dile to cut a hole and add a pale blue eyelet. I added a little bit of irridescent blue ribbon through the eyelet and turned my die cut into a tag :)
So here is where it got tricky. I had to work out how to position everything and stick things so that the tag would slide in and out easily enough. As I was working things out I decided to use the extra piece of the clock for two reasons. The first was as an added accent. the second was to make it easier for the element I was placing there. I glued the clocks on with glossy accents making sure that there was plenty of room for the tag to slide in and out.
I then started playing about with the elements to get them where I wanted them.. I used a combo of glossy accents and foam squares to add the elements depending on where they would be placed. For the large cog I was careful to only place tape on the left side so the tag could slide under.
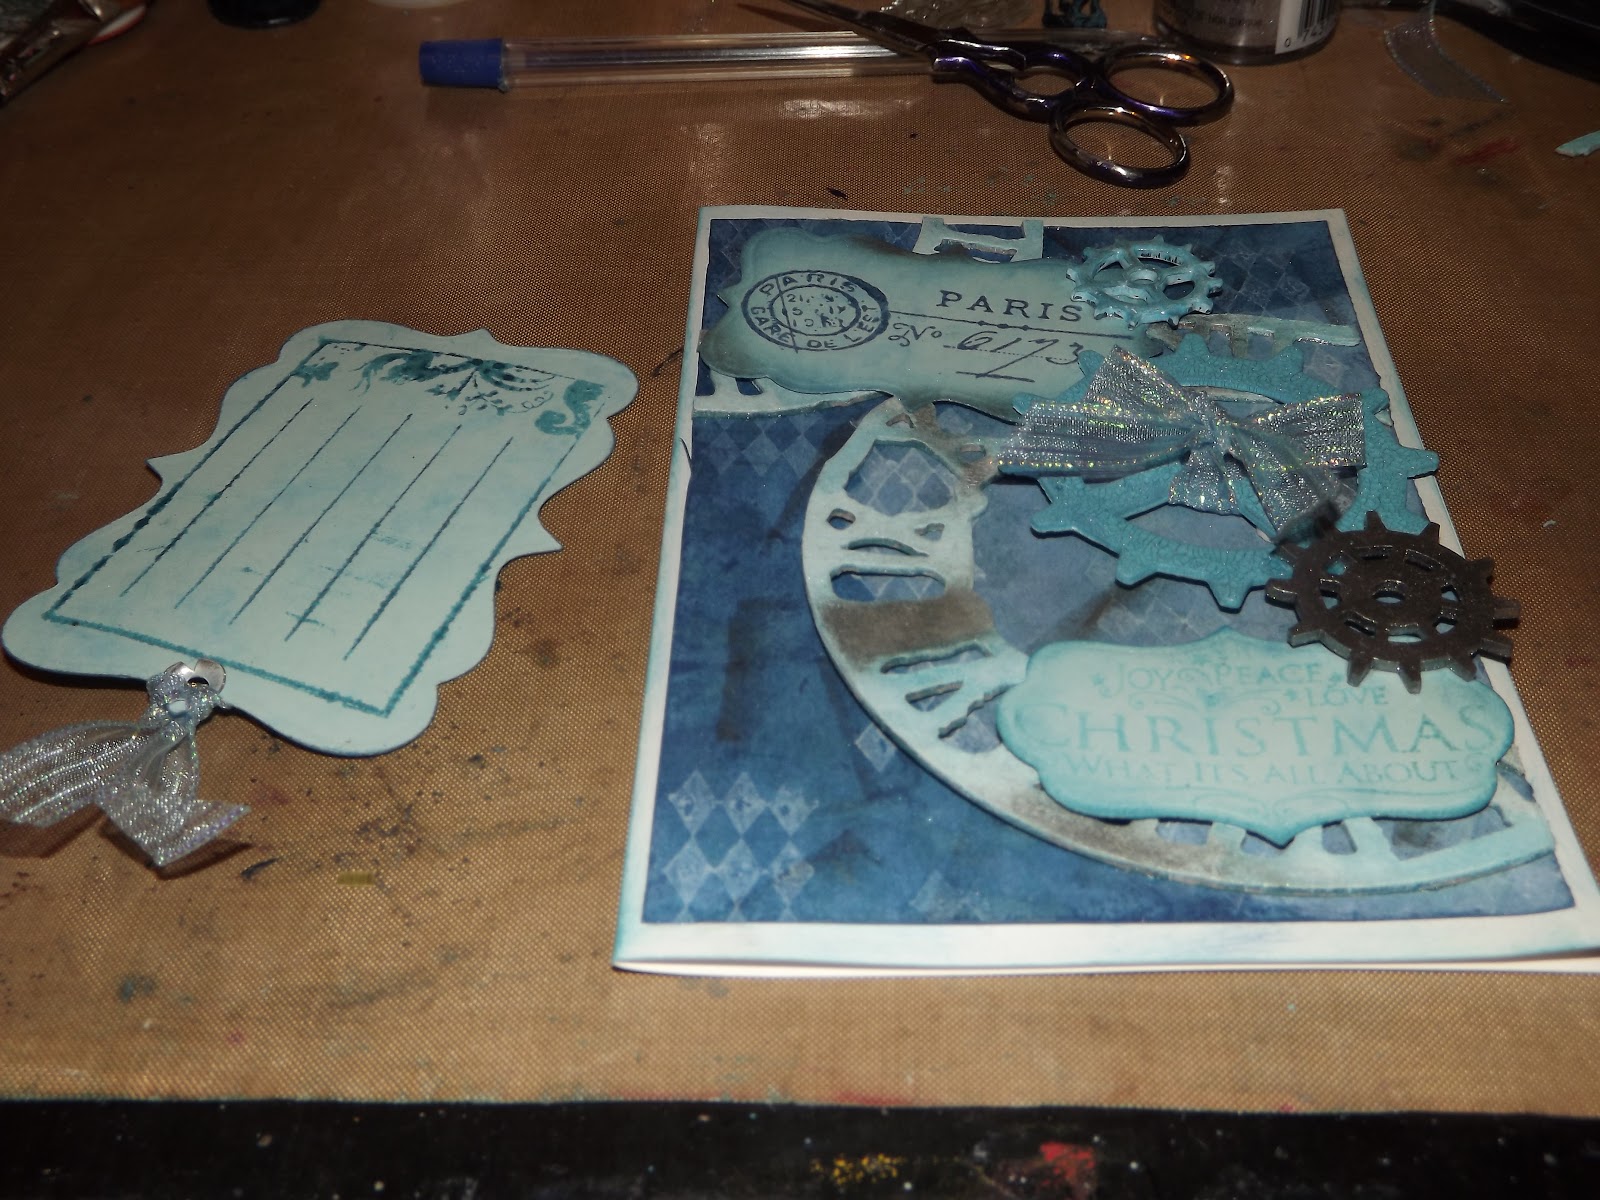
A pic of card and tag together. Card still looks pretty good without it...
And the finished card :) Yay! This one took a lot of thought and effort and trying things til it gelled.
Hope you all like this card as much as I do. I have finished all 12 cards now and it is still my fave!
Thanks for stopping bye.
Happy Scrappin'
Purple
Labels:
cuttlebug,
distress ink,
distress stain,
distress tool,
embossing powder,
homemade glimmer mist,
paint dabber,
pearl ex,
perfect pearls,
ranger,
sizzix,
stampers anonymous,
tim holtz
Tuesday, 13 December 2011
12 Cards of Christmas T!m Holtz Style Card 7
Well here I am on the home stretch. Tag 7 is done and dusted :). Tag 8 is giving me a headache already but I am determined to get it knocked out tonight lol. Here is my Inspiration from T!m.
Card 7
I started by pilfering an old book off my eldest daughter. It has nice thick pages, almost like mulberry paper but thinner than that.
I used my ecraft to cut leaves in a few different sizes. The leaves are from Fundamentals 1. I didn't end up using the rounder ones. I'll use them for something else.
I started with the 3" leaves and coloured them using my distress inks and tool. I used a combination of Evergreen Bough, Pine Needles, Iced Spruce and Gathered twigs.
I took my water mister and sprayed them so they were very wet. I carefully lifyed them off the craft mat and scrunched them into teeny balls. I opened them very carefully, then dry them with your heat gun. As I was working I decided I didn't want to use the big leaves so I also made some 2.5" leaves.
If one happens to break or tear one slightly overlap the break or tear and hold that spot with your tweezers while you dry it with your heat tool. I used glossy accents to stick the two pieces together.
Once dry I used some more distress ink with my distress tool to add some extra colour and dimension to the wrinkles. I then used some Pearl-ex in the colours of Spring Green, Interference Green and Mink over the leaves for some extra colour and sparkle.
Using another free svg I have in my svg stash I cut a lamp post using DCWV White Core cardstock in black from the Jewel stack. I learnt while doing this intricate cut a couple of things. First turn the side of cardstock you want to use to the bottom when cutting as the top ends up a bit raggedy. Second is to use the T!m Holtz method of sanding which is to leave the cut in the cardstock while you sand. Pop it out when your done.
I inked the lamp post with Walnut Stain, probably should have left it in the cardstock to do that as well as there are some very fine details. I used Perfect Pearls in Perfect Gold on the lamp post to make it a little more interesting.
Back to the big leaves before I decided I wasn't using them ;). I pinched the bottom of the leaves and used some glossy to stick the folds together. This gives them a little shape. I didn't do this step with the smaller leaves.
To make my background I took Tumbled Glass and Pumice Stone Distress Stains and layered them on white cardstock. I started with Tumbled Glass, then went over it with Pumice Stone then another layer of Tumbled Glass. I then spritzed a little water in spots and flung big drops in others.
I grabbed the large flourish die from the Boundless Flight Stampers Anonymous set and inked it up with Frayed Burlap Distress Ink. I stamped the flourish over the whole background.
I grabbed three 8mm red pearl beads and two different size head pins and my beading tools.
I added 1 bead to the shorter head pin and two to the longer one and used my tools to loop the ends around. I am not the best at doing this but it works lol.
I bought an old lace curtain from a second hand shop and cut a random ribbon like strip. I used Pumice Stone and Tumbled Glass Distress Stains to colour the lace. if you dry lace with a heat gun don't get too close!
I grabbed a copper jump ring and looped the beads onto it. I then threaded the coloured lace thought and tied it in a bow.
I thought it was still a little bland and decided to add some gold ribbon. The ribbon was too bright so I went over it with some Pumice Stone Distress Stain. I looped it through the jump ring and tied it in a knot.
First I grabbed a piece of cream cardstock and used Pumice Stone Distress Stain over it and sprayed with water. . I stamped with Perfect Medium and used black embossing powder. I then used some Perfect Gold Perfect Pearls in a few spots and reheat set. Unfortunately I swiped my finger over it before it had cooled completely and wrecked it lol. So I had to start again.
I cut around my sentiment out and then distressed the edges with Iced Spruce and Evergreen Bough.
Now is the point I played with the different sizes of leaves I made for ages trying to decide what to do lol. How many to use, where to put them, what sizes etc. In the end i took the three 3" leaves and two 2.5" leaves and layered them together and glued with glossy. I placed the ribbon and bead bow in the middle and used a good blob of glossy to glue it on.
I stuck my lamp post down on the left, then the leaves and berries over the top. I used dimensional tape to pop my sentiment off the background. I then added some glossy to the little windows in the lamp post to make them look more glass like. card Done :)
Woohoo seven down five to go!
Happy Scrappin'
Purple
Subscribe to:
Posts (Atom)