Hiya, long time no talk . . . My cat really did it this time :( She knocked a pretty big cup full of water all over my laptop and while it still works not all the keys work properly lol. So I have to use a combination of laptop and tablet to do a post and well most days it's just too much work lol. Anyways the challenge at Eclectic Ellapu for the Purples this time is Birthdays with Butterflies. If You didn't guess I picked that one ;) Not many pics this week as that's just too much work switching constantly between pad n lappy lol.
So because I just got my Inktense pencils and some new spellbinders dies I thought I would combine the two. The dies I used are In'spire Celebration and Flutter Tree D'lites. For a full list of suplies look in the labels. The copious amounts of cutting were done in my Ebosser.
1. Cut 6 sets of trees, butterflies and sentiments from plain cs
2. Stamp background and then position tree and sentiment, die cut
3. Colour the background with a watercolour medium ( I used my new inktense set squeal), I hadnt kept my middle tree pieces but I decided the finished card needed them and went a hunting lol. Next time I will make sure to colour these at the same time too.
4. Glue the 6 trees together plus the stamped tree, glue 3 sentiments plus the stamped one together.
5. Once you have trimmed your background cut a card base to measure and then go over the edges of the base and background with white Adirondack Paint Dabber
6. Adhere background to base and then add the tree and sentiment.
7. The butterfly dies join two together at a time so what I did for these was turn my stamp stamp side up and work out roughly where I wanted the butterflies and pressed them onto the stamp then matched up the lines on the background.
The inspiration for this card came from one Jennifer McGuire posted on her blog a few months ago. She only used a sentiment but I thought this is so cool it could work with anything :)
Happy Scrappin'
Purple
Showing posts with label paint dabber. Show all posts
Sunday, 6 July 2014
Friday, 13 June 2014
More of My First Mini Part 5
Getting there :) The next images we got a little Australian followed by a lil camp :) lol
Ok so we started with Prima and KaiserCraft papers, spellbinders butterfly circles, a tag cut with my ecraft and some brads and pearls.
Flowers close up ;) I added white adirondack paint dabber around around the edges of the mini albums mini album lol
The first page flips open for some journalling with some more flowers and brads. The darker pages you see here are from a magazine from years ago lol.
The lace holds the book in place as it is fully removable.
I guess this is where we get camp haha. I used Lifestyle Crafts dies for the lettering and corner flourish. I love this KaiserCraft paper, all the white lines are flocked.
A little Priscilla with both my girls.
And some Dame Edna for the Aussies and Brits who know who she is lol.
And then we went a little Gaga. The panel that says Gaga is actually a little teeny pocket to hold the tag that's behind in place.
The tag has a Lifestyle Crafts Tab It Kit tab on it.
The back was done with Distress Stains and edged and stamped with distress inks. Hopefully all these journalling spots have been put to good use . . .
Happy Scrappin'
Purple
Ok so we started with Prima and KaiserCraft papers, spellbinders butterfly circles, a tag cut with my ecraft and some brads and pearls.
Flowers close up ;) I added white adirondack paint dabber around around the edges of the mini albums mini album lol
The first page flips open for some journalling with some more flowers and brads. The darker pages you see here are from a magazine from years ago lol.
The lace holds the book in place as it is fully removable.
I guess this is where we get camp haha. I used Lifestyle Crafts dies for the lettering and corner flourish. I love this KaiserCraft paper, all the white lines are flocked.
And some Dame Edna for the Aussies and Brits who know who she is lol.
And then we went a little Gaga. The panel that says Gaga is actually a little teeny pocket to hold the tag that's behind in place.
The tag has a Lifestyle Crafts Tab It Kit tab on it.
The back was done with Distress Stains and edged and stamped with distress inks. Hopefully all these journalling spots have been put to good use . . .
Happy Scrappin'
Purple
Sunday, 13 April 2014
More of My First Finished Mini Part 3
So I started posted pics of this mini and never got to the end... What a slacker lol. I had to fit many photos into a small space so you will see many flip out, pull out or and opening pages. I tried to make them all different too :)
A day at the Aquarium in Sydney with some pretty prima papers.
A lifestyle crafts window die to reveal the dugong :)
I made a flip out book and decorated it with a spellbinders butterfly circle and prima flowers
Added lots of pearls to this page with Kaisercraft papers.
A spot for journalling. All edges are inked with either Adirondack white paint or Distress ink or a combo of both lol
Fully opened with my youngest getting touchy feely with the local wildlife. We never know from one trip to the next if she will touch anything or not lol. I will Schedule a post a month to finis showing my Mini :)
Happy Scrappin'
Purple
A day at the Aquarium in Sydney with some pretty prima papers.
A lifestyle crafts window die to reveal the dugong :)
I made a flip out book and decorated it with a spellbinders butterfly circle and prima flowers
Added lots of pearls to this page with Kaisercraft papers.
A spot for journalling. All edges are inked with either Adirondack white paint or Distress ink or a combo of both lol
Fully opened with my youngest getting touchy feely with the local wildlife. We never know from one trip to the next if she will touch anything or not lol. I will Schedule a post a month to finis showing my Mini :)
Happy Scrappin'
Purple
Wednesday, 19 June 2013
More of My Kaisercraft/ Prima Mini
There are quite a few pages to this mini. So instead of inundating you with a super large post with way too many details I am going to break it up into more manageable sections like I did for the cover. I will also try to share in the order they are in the book as each part is for a different place we went to in a two day period.
That being said, I forgot to take pics of the third and fourth pages :( lol. They were taken in the butterfly enclosure at Wild Life Sydney Zoo and had papers from Prima Fairy Rhymes and a couple of die cuts with some K&Co 3D butterfly stickers.
Next I made an envelope page using the Lifestyle Crafts Basic Envelope set using the largest envelope. I then used the insert as the basis to make a flip out panel that has 3 photos on one side and two on the other with a journalling spot as well. The paper flowers are from Prima with an added resin flower (same as on the cover but pink) and some brads.
I cut the koala using a quickutz die from the Australia set (can be found on ebay). I have been itching to use this set! lol The jouranlling spot was stamped with worn lipstick. ( I will gather all my supplies and have a full list of what I can find/remember with my last post. Promise!)
As you can see a little bit in these pics I edged them with Adirondack Snow Cap paint dabber. I also did this around the blue matting. I also added a lil snow cap to the Koala to tone down the grey and because Koala's do have a lot of white in their fur :)
Next up is a page that flips open and has a tag tucked up behind it as well. The flip pages were pics taken in the Kangaroo enclosure and in front of the Rock Wallabies.
The tabs are from Lifestyle Crafts Tab It kit, the boarders are from a KaiserCraft stack. You can really see in this pic how each page of this album has been edged with snow cap paint and then distressed with spun sugar and worn lipstick.
The jounalling spot is is taken from the middle of another Lifestyle crafts Whimsical die (a leftover from using this die on page 2 to frame a pic). It is not actually stuck down yet, ready for journalling. The Kangaroo is another from the Australia set used for the Koala. I edged the roo with rusty hinge to make it more in line with the giant Red Kangaroo statue.
For the tag both pics are very large. You can see in the background of this pic the Crocodile in the background. Let me tell you that is one huge croc! The zookeeper told us his story and why he was there. Suffice to say he is the male version of a black widow ;) lol.
Anyway that's it for today lol. in the next installment there is a window page and another flip out book :) Feel free to ask any questions! I will answer the best I can. All cutting has been done with my trusty Ebosser.
Happy Scrappin'
Purple
That being said, I forgot to take pics of the third and fourth pages :( lol. They were taken in the butterfly enclosure at Wild Life Sydney Zoo and had papers from Prima Fairy Rhymes and a couple of die cuts with some K&Co 3D butterfly stickers.
Next I made an envelope page using the Lifestyle Crafts Basic Envelope set using the largest envelope. I then used the insert as the basis to make a flip out panel that has 3 photos on one side and two on the other with a journalling spot as well. The paper flowers are from Prima with an added resin flower (same as on the cover but pink) and some brads.
I cut the koala using a quickutz die from the Australia set (can be found on ebay). I have been itching to use this set! lol The jouranlling spot was stamped with worn lipstick. ( I will gather all my supplies and have a full list of what I can find/remember with my last post. Promise!)
As you can see a little bit in these pics I edged them with Adirondack Snow Cap paint dabber. I also did this around the blue matting. I also added a lil snow cap to the Koala to tone down the grey and because Koala's do have a lot of white in their fur :)
The tabs are from Lifestyle Crafts Tab It kit, the boarders are from a KaiserCraft stack. You can really see in this pic how each page of this album has been edged with snow cap paint and then distressed with spun sugar and worn lipstick.
The jounalling spot is is taken from the middle of another Lifestyle crafts Whimsical die (a leftover from using this die on page 2 to frame a pic). It is not actually stuck down yet, ready for journalling. The Kangaroo is another from the Australia set used for the Koala. I edged the roo with rusty hinge to make it more in line with the giant Red Kangaroo statue.
For the tag both pics are very large. You can see in the background of this pic the Crocodile in the background. Let me tell you that is one huge croc! The zookeeper told us his story and why he was there. Suffice to say he is the male version of a black widow ;) lol.
Anyway that's it for today lol. in the next installment there is a window page and another flip out book :) Feel free to ask any questions! I will answer the best I can. All cutting has been done with my trusty Ebosser.
Happy Scrappin'
Purple
Sunday, 1 April 2012
Creative Chemistry 101 Day Eight
Almost there! :) What an adventure this has been. I can say I have loads of extra's I haven't made into anything yet. But I do have 11 complete cards so far to show you later :)
Day 8 was paint. I still have one work in progress. I used milled lavender for my crackle and am ho hum about it lol... But it still needs some distressing so we shall see how it turns out :)
So my first two are okish but is a bit hard to see the resist in normal light. This is because it is unprimed canvas (I don't have any sticky back). Next time I will prime first! I like the colours though :)
Butterflys! swoon lol I misted this one with water so that the white would pop more...
Ok even more butterflys. This is the technique on plain old cs. As the canvas wasn't working thought I would try this lol. Love how it turned out!
Ok ones just a lil dark lol. Was too busy haaving a chat ;) and forgot to dab the flowers lol.
Ok so rather than post without the last pic I decided to suck it up and post lol... Had a bit of problem with my sticky stamp lifting the crackle pain but I think it adds to the distressed look :) lol
So we are close to the end :( Hopefully there will be another class at some point!
Happy Scrappin'
Purple
Wednesday, 18 January 2012
My first Journal Page!
Ok so you already know I bought a new journal today. You also know I drew a picture... So the two go hand in hand and I decided to do my first proper art journal page :).
I wanted to use a Tim Holtz stamp but the one I had wasn't big enough :( So I took my metal ruler and a sharpie and drew my own rays. I then coloured the rays in.
I completed colouring and hated the straight lines! So I added a bit extra to my lines ;) I then grabbed a Pitt Big Brush Marker in Light Pthalo Green and filled in in between the lines. I like the streakiness of both markers on this journal paper as it lends to the ray feeling. In fact I tried to make them extra streaky! lol
I grabbed some Tim Holtz Stampers Anonymous stamps from a bunch of sets and my Picket Fence Distress Stain and stamped various images around the rays. Love love love the dropping butterfly! I then grabbed my Snow Cap Paint Dabber and used the stamp with the words Love wish dream on it at the bottom of the page over the top of the other images :)
You can also see in the above pic a a few extra colours lol I was testing my pitt markers to see which I would use...
I then grabbed an Autum Leaves Stampology alpha to stamp Purples Journal in black stazon. I noticed at this point the white paint was lifting some of the stazon colour into it. Good to know for future reference!
I wanted to use a Tim Holtz stamp but the one I had wasn't big enough :( So I took my metal ruler and a sharpie and drew my own rays. I then coloured the rays in.
I completed colouring and hated the straight lines! So I added a bit extra to my lines ;) I then grabbed a Pitt Big Brush Marker in Light Pthalo Green and filled in in between the lines. I like the streakiness of both markers on this journal paper as it lends to the ray feeling. In fact I tried to make them extra streaky! lol
I grabbed some Tim Holtz Stampers Anonymous stamps from a bunch of sets and my Picket Fence Distress Stain and stamped various images around the rays. Love love love the dropping butterfly! I then grabbed my Snow Cap Paint Dabber and used the stamp with the words Love wish dream on it at the bottom of the page over the top of the other images :)
You can also see in the above pic a a few extra colours lol I was testing my pitt markers to see which I would use...
I then grabbed an Autum Leaves Stampology alpha to stamp Purples Journal in black stazon. I noticed at this point the white paint was lifting some of the stazon colour into it. Good to know for future reference!
Wednesday, 28 December 2011
12 Cards of Christmas T!m Holtz Style Card 9
So here is card 9... Almost there.. Chugga Chuggin along lol. I had to change this up a bit as I don't have these Tim things lol. I even used my seedless preserves. Yummy! Lots of eCraft cutting going on in this card :) Got to love my purpleberry! So here is T!ms tag and my inspiration...
Card 9
Well I don't have the stamp Tim used or the dies so I decided that I would do a similar design to his using what I have. I think of all my cards this is the one that closest resembles his tag.
I started by using my fiskars stamp, sorry cannot remember the name at the moment lol, I stamped with Seedless Preserves from the autumn set (I had to sneak it in somewhere or my name isn't purple!!!), then covered with Ranger Superfine Embossing Powder.
Next up I grabbed my Evergreen Bough Distress Ink and my Distress Ink tool and covered the whole page. As we have already embossed the purple it acts as a resist. I then dumped more embossing powder over and heated with my heat tool. I love this technique so much I think I want to try it some more!
I then went on a mad hunt through my svg's to find one to use. I found a different lamp post to the one I used on card 7 but some of the lines were so thin they just did not cut properly. So I gave up on that idea and found a candlestick and candle instead. I love SCAL 3 for the fact I can ungroup images and hide some til I want to use them! Unfortunately I did not label svg's as I downloaded them so my free ones I have no idea where they came from :( Thanks to whoever designed the candle and candlestick svg I used. Below is the image I wanted to use :(
I opened the file in SCAL 3 and hid the base to cut the candle out of white cs, I then unhid the base and hid the candle and cut this out of black cs. I had tried a red candle but it just wasn't working.
I grabbed a recollections star and flourish stamp from the merry merry set and stamped my candle with Festive Berries. I embossed this with Ranger superfine and then glued to my base with Glossy Accents.
I grabbed a flower I had made when I was working on card 1. This Poinsettia is red and I have painted over it with Triple Thick to give it that nice shiny effect. I cut more leaves using Fundamentals 1 on my ecraft. The Poinsettia has yellow seed beeds in the middle and is made the same way as in Card 1.
With my pastel Bic Permanent markers i coloured in a piece of scrap shrinkies I cut in the shape of a flame and shrunk it with my heat tool.
I glued the flame down with glossy and the added little drops of glossy to the wreath I had leftover from cards 3 and 5. I then added red seed beads to take away the plainness.
I chose a font in SCAL3 and cut the word Christmas out of black cs. I adhered it to my card and covered in Glossy Accents. After I added the glossy I set this aside to dry in a warm spot for a while.
So once the card dried and I replaced the seed bead that had fallen off.... Card 9 was finished. As I said before this one is the closest to T!m's that I made. I really have tried to make mine somewhat different :)
Hope you are enjoying my 12 cards so far :) the people that are receiving them are loving them at least :) Please leave a message and a link to your blog iff you are enjoying my cards!
Thanks
Happy Scrappin'
Purple
12 Cards of Christmas T!m Holtz Style Card 8
So here it is my favourite so far and the most labour intensive lol. This one took a good long while but it made it here in the end :). I love steampunk but the challenge for me was to change it up by using a different colour all together and yet still somehow get that christmas feel. I spent a whole hour trying to make a stamped shrink clock that I ended up putting aside as the colour didn't work lol... Definately a challenge! My Inspiration a la T!m.
Card 8
It started with a clock. That's the main element I wanted to add to my card. The challenge was how to make something spectacular with said clock.... lol. I cut my clock from the Sizzix Weathered Clock die and set it aside and got to work on my background.
I cut white card to size and covered it in Tumbled Glass Distress Stain. i dried it with my heat tool and the misted with home made mist. The mist is made from Denim Color Wash and True Blue Pearl-Ex. I added some cling Wrap over the top and scrunched. Ok I need to learn to walk away for a while and leave it alone lol.
This was the result... Sorry about the shadow but it has the best colour lol.
I grabbed the clock and covered it in Snow Cap Paint Dabber then went over it with Tumbled Glass Distress Stain. After that dried I added some more stain to get some more colour on there.
I then grabbed my Pearl Ex in Silver and my Perfect Pearl Brush and added some more colour on to the clock. In the end I also added a smidge of Faded Jeans to the clock as well.
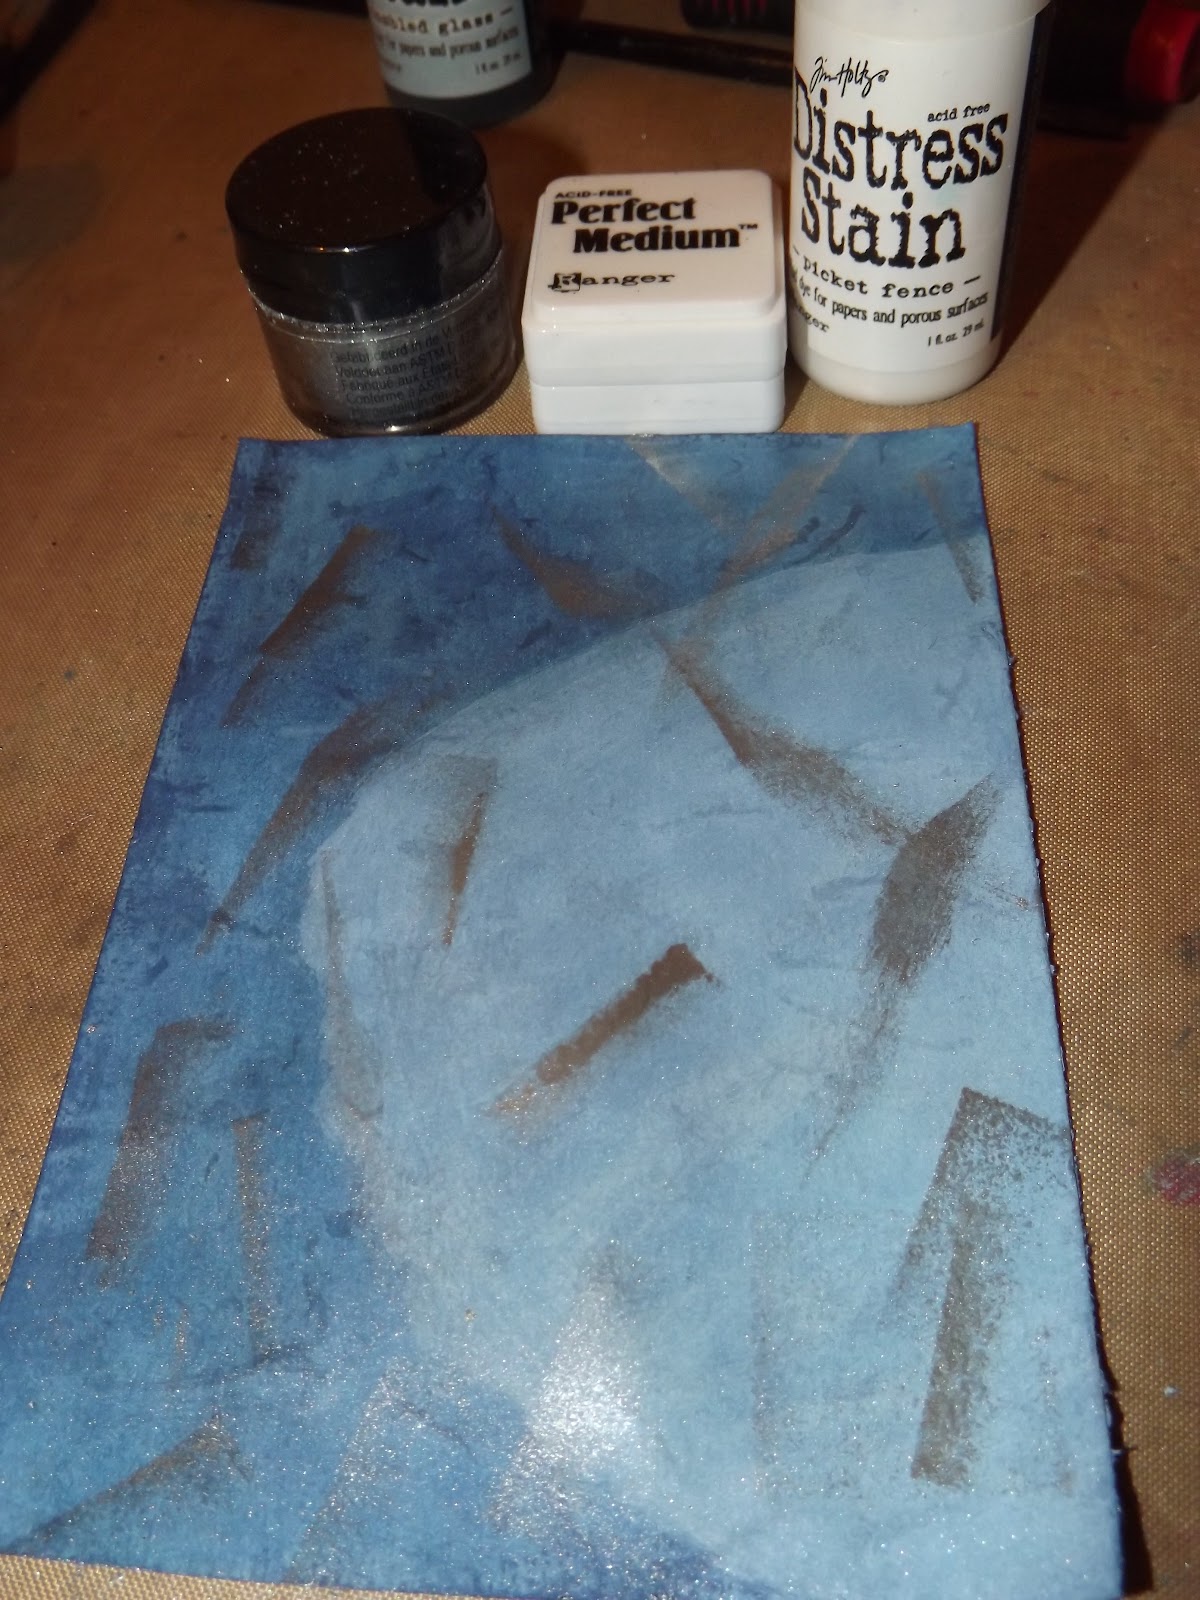
I tend to jump around from one place to the next when I am crafting so I grabbed my background and decided to give it a boost. I used Picket Fence Distress Stain to lighten a portion of it. I wasn't worried about the shape too much as I knew a lot would be covered over. I then took my Perfect Medium and used the pad edge directly on the page to add some lines. I went over that with Silver Pearl-Ex.
I grabbed a stamp from Flight's of Fancy and used tumbled glass to stamp some watermark type effects onto the background. As you can see it is very feint. I decided it was to feint later and added more :O...
I then grabbed a piece of blue marbled cardstock from my stash and stamped my sentiment with a Stampers Anonymous stamp. I used Faded Jeans Distress ink and quickly tossed some Ranger Ultra Fine Embossing Powder over the top and heat set. I then used a Lifestyle Crafts die and positioned over my stamp to try and make it even on each side. I used some Scotch Vellum Tape to hold the die in position as I ran it through the Cuttlebug.
I ran it through again with the Spellbinders Tan mat to give a little edge to custom die cut.
First up I used tumbled glass with my distress tool to edge my die cut, I then went round again and added faded jeans to the edge. On top of that in selected locations I dabbed on some silver pearl ex.
I cut a cog with my Gadget Gears die and then mixed white and Broken China Crackle paints together. I don't have tumbled glass so was the best I could do lol. Hmmm wonder if you can add reinker to white... lol. Might try that next time I need a colour I don't have....
I liberally painted my cog. I used all that paint :O, lol I thought I had made far too much, and set it aside to dry.
At this point I will say I got some shrinkies and polyshrink the other day and was playing around with them. I made a small cog with one using the medium gadget gears cog. I then used perfect medium all over and sprinkled light blue embossing powder over before heating and shrinking with my heat gun. Once it was cooled a lil I used some silver pearl ex to give some shine. Here is a pic of me trying it out on my card while the other cog was drying.
Here is where I added another layer to the background lol. Taking the same stamp as before I used my Picket Fence Distress stain direct to the stamp to add some lightness.
Once the crackled clock was dry I went over it with some denim distress ink and a make up wedge.
I wanted to use broken china distress pad but I don't have one. So I cut a square of Cut-n-Dry Foam and made my own temporary one til I get the pad lol. Easy peasy, Cut-n-dry and a few drops of reinker. Done! I will say don't add too much reinker a little goes a very long way... oops...
I used my custom ink pad to stamp a bird image and then embossed again with the super fine. I used a bigger lifestyle crafts die to fit around the bird. Again I used the spellbinders tan mat to emboss after I cut the shape. I stamped the diamond pattern using the custom pad. I stamped multiple times with the one inking to give the lighter effects.
I went around the edge with broken china and faded jeans. I then used mink pearl ex on the tree branch and added some blue russet pearl ex to the bird for a wing and to his belly as well for a christmassy look. I used a permanent marker to add a little eye.
I then grabbed that piece and the crackle cog from earlier and added some silver pearl ex around the edge of the die cut and all over the cog to give it some shimmer :)
I then spent aan hour making shrink clocks, til I made a perfect one... That I didn't end up using because it just didn't suit the card! That's ok it will find a home somewhere one day!
So then I cut a large cog out of shrinkies and shrunk it down with my heat tool. I went over it with perfect medium and then silver pearl-ex. I found the pointy tweezers in the pic on ebay in the nail art section. they are brilliant for bling and holding stuff when your heating! lol Love em!
Again I had another element I really wanted to put on this card but it wouldn't go lol...
Clean it off set it aside for another time... I should add that I found on the way to getting my daughter off the bus one day...
So then I grabbed some more of that gorgeous blue marbled cardstock and stamped a Christmas sentiment on there in tubmbled glass, threw some embossing powder over the top and embossed it :). Using the same method as before I positioned in a lifestyle crafts die and taped it down and ran it through the bug to cut and emboss. I then edged it with broken china and faded jeans.
Almost there... Phew this is a long one hey? lol...
Ok next up I decided I wanted to take it to the next level so I grabbed the bird die cut shape and flipped it over. I used a lil' davis journalling stamp on the back, then used my crop-a-dile to cut a hole and add a pale blue eyelet. I added a little bit of irridescent blue ribbon through the eyelet and turned my die cut into a tag :)
So here is where it got tricky. I had to work out how to position everything and stick things so that the tag would slide in and out easily enough. As I was working things out I decided to use the extra piece of the clock for two reasons. The first was as an added accent. the second was to make it easier for the element I was placing there. I glued the clocks on with glossy accents making sure that there was plenty of room for the tag to slide in and out.
I then started playing about with the elements to get them where I wanted them.. I used a combo of glossy accents and foam squares to add the elements depending on where they would be placed. For the large cog I was careful to only place tape on the left side so the tag could slide under.
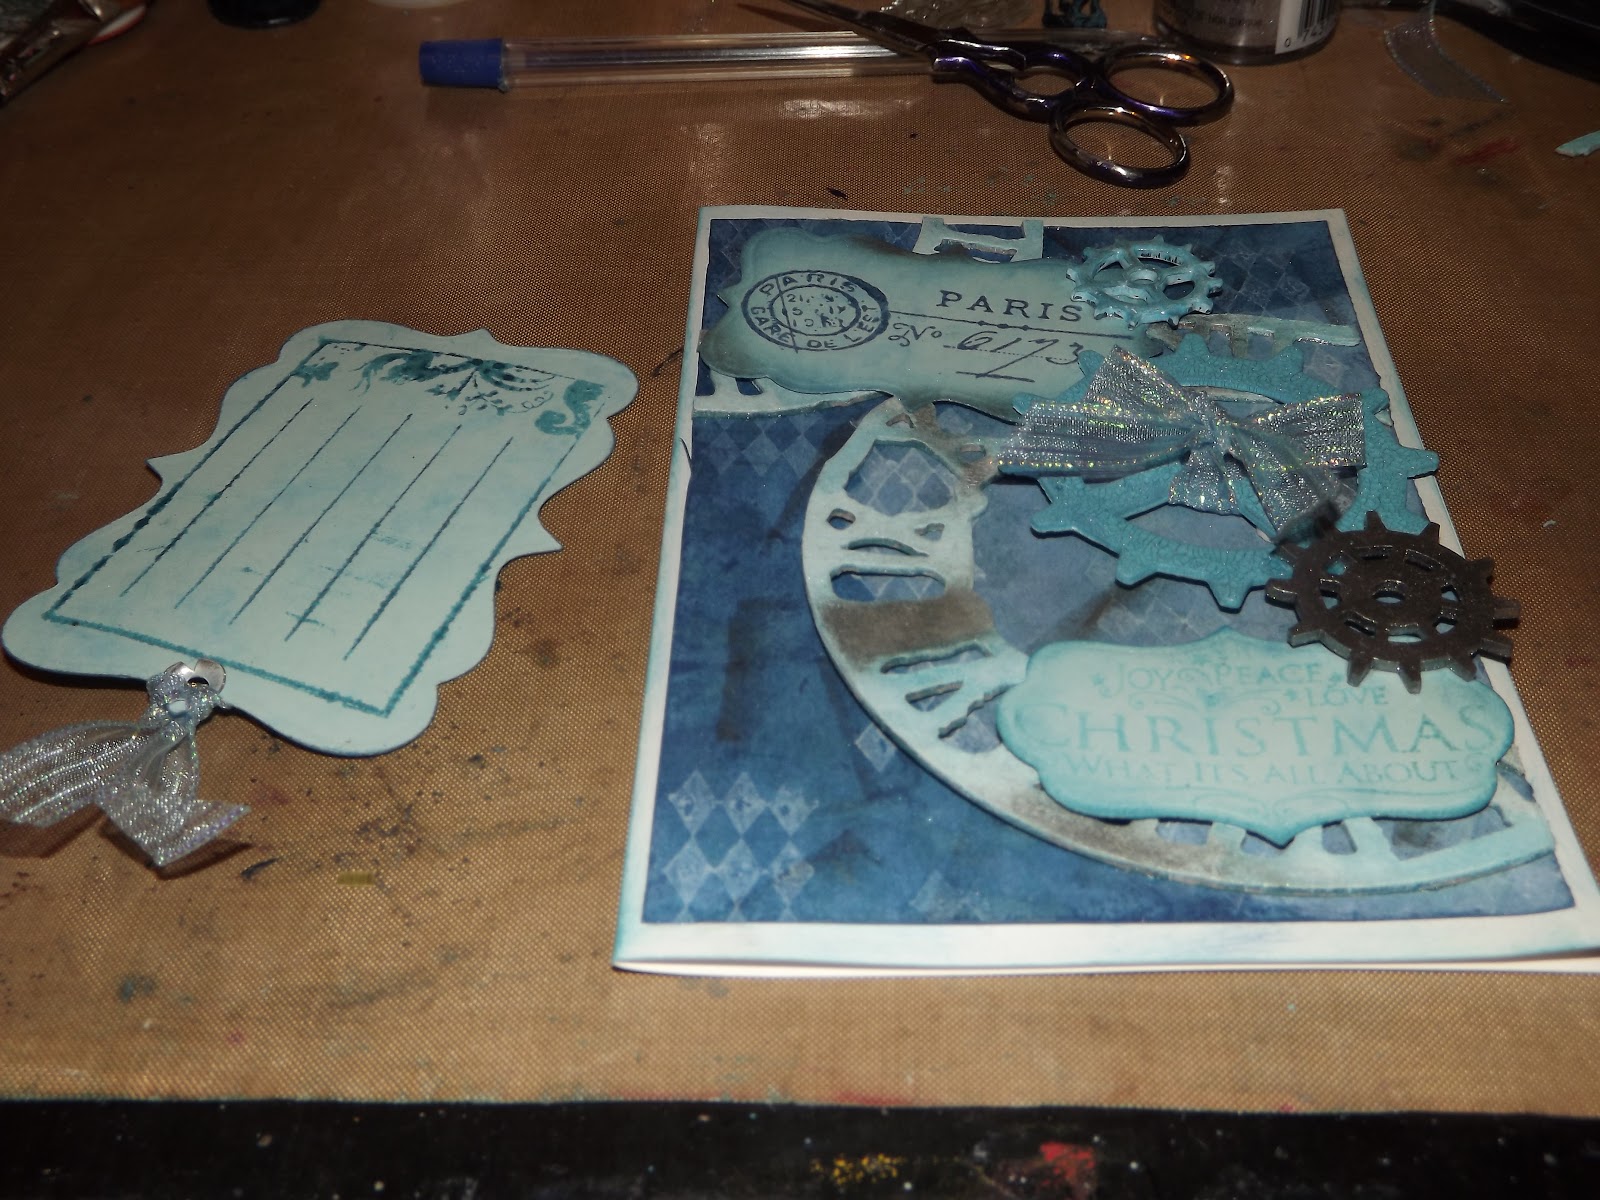
A pic of card and tag together. Card still looks pretty good without it...
And the finished card :) Yay! This one took a lot of thought and effort and trying things til it gelled.
Hope you all like this card as much as I do. I have finished all 12 cards now and it is still my fave!
Thanks for stopping bye.
Happy Scrappin'
Purple
Labels:
cuttlebug,
distress ink,
distress stain,
distress tool,
embossing powder,
homemade glimmer mist,
paint dabber,
pearl ex,
perfect pearls,
ranger,
sizzix,
stampers anonymous,
tim holtz
Subscribe to:
Posts (Atom)