blinkie

CraftyCrafter

Showing posts with label distress tool. Show all posts

Monday, 6 May 2013

Ahoy Matey with Mpress Journeys

After an extensive Google search that shows me nothing.... lol I am pretty sure the stamp set I have used for this card is Mpress Journeys. Unfortunately it seems like you can't get it anymore :( I eventually had the  brainwave to go check previous orders on the website where I bought it.
As you can see here the mat for the card was stamped with the map, then crumpled and flattened back out and distress ink added to the ridges and spritzed with water to move the colour around. Then a good amount of distress ink was added around the edges to add a border and the edges distressed with the Tim Holtz Distress Tool.
I stamped and fussy cut around the ship and lighthouse before distress inking around them. A little too much ink ended up on the lighthouse lol . . . I added these to the card with foam tape. I used two Lifetsyle Craft Nesting Labels dies and my Ebosser to create the mount for the sentiment. No I didn't miss stamp. That's how the sentiment is :P
I love this stamp set. Such a shame you can't get it anymore :( All the elements were stamped with Timber Brown Stazon onto white cs then distressed brown. Some elements came out a lil darker than I wanted but as this card is for a boy I figured he would hardly notice lol...
Happy Scrappin'
Purple


PS I have been posting from my stack of drafts as it has been school holidays and crafting has been on the down low. Should have some exciting new projects to share very soon :)

Monday, 27 February 2012

Stampendous Baby On Board Page


Hi everyone. Sorry it's been a while, loads of studying going on as well as helping my mum and volunteering at school etc :). That's not to say I haven't been crafting, I have been working on a secret project that I will be able to share in a couple of weeks :) and another that I will share at the end of April. Can't share them before the recipient receives them!

So I had been looking for a project to use the Stampendous Cling Thinking of You set. I decided to enter the Stampendous texture challenge and was going through the list of my stampendous stamps and thought I know just the one :).


Then I went through my photo's and found these three from when I was pregnant with my first child way back in January 1996. I had already formed a vision in my head of a page of circles. Well not really a vision just an idea lol.

I stamped the medallion onto my waffle texture cardstock with Tumbled Glass, Broken China and Faded Jeans Distress inks. I then used the same stamp and my Versamark pad on plain cs and embossed with Ranger Fine Detail Clear Embossing Powder for texture. After heat embossing I cut these with my Lifestyle Crafts Circle dies using some florist tape to hold the dies in place.

I cut my photos with various sizes of scallop circle dies... Yes I know they aren't scalloped anymore. I changed my mind... I just felt the three scalloped photo's looked out of place. This is a page in progress shot showing the scalloped pics and temporary placement of circles....lol The circles are held in place with repositionable tape.


After that I had to take everything off because my cat had decided it was a nice bed while I was sleeping and left kitty hairs everywhere! lol.

I used my three colours of distress ink starting from the lightest, tumbled glass, and my distress tool and completely covered each embossed circle. I then used broken china, leaving a small area of tumbled glass visible in the centre and finally faded jeans around the edges. I did this for many many stamped images so I could then cut them smaller and have the various shades on each piece.

Using inkscape and a jpeg image I found online and a youtube tutorial I created an svg file of a pregnant lady to finish off my page. I cut her out with my ecraft and again stamped her with the medallion and embossed her. I used the same three distress inks to tie her in with the rest of my page. For added dimension each of my ladies is adhered with foam tape as are some of the pics and dots.


Here is another  view of the other side. My words are glittered american crafts thickers for even more texture.


 I craftily hid a journaling spot between the top and middle photo. one of the spots just big enough to add the required info to, I didn't want it to detract from the page itself by adding ribbons and things so I just created a little area to stick a circle that could be removed :).

Hope you enjoyed my page, Thanks for looking and
Happy Scrappin'
Purple

Wednesday, 28 December 2011

12 Cards of Christmas T!m Holtz Style Card 10


So this one ended up being a real challenge. Cannot tell you how many different things I tried with it lol. I kept wrecking my tape or the image on the tape. I can also tell you gold leaf looked horrid on the back :). My 8 year old helped by deciding the placement of the bow and beads. Little artist in the making :). Here is my inspiration from T!m...


Card 10


We first off with this one my packaging tape was MIA lol so my daughter nicely got me some on town. I have at least 2 rolls hiding in the house somewhere all ready... but what can you do? lol.

I was making the tape images one at a time so I actually ended up making about seven images all at once to make sure I could try  different techniques and have standby's in case I wrecked them some more :) lol.

To start off I didn't have any facets (I did get some in the mail from ebay after I completed this card of course!) so I grabbed a couple of round buckle-ups and ties from one heart one mind. The paper pictured is a kaisercraft one but poor santa had gold leaf put behind him and you couldn't see him anymore lol.


I positioned my acrylic piece over a santa so that he was centred and  then cut a larger square around him. For the seven I did later I used a marker and drew a large circle around my image to cut out.


I then added my tape to the image. Make sure you put the tape over the side of the image you want to use. I made the image stick to the craft mat by making the tape larger. I the used my finger to "burnish" the image. Basically that means rubbing my finger or thumb over the tape til it is really well adhered to the image. I then cut the excess  tape off  and threw it in a bowl of warm water. Scary I know!


Make sure paper side is down soaking under the water and then use your fingers to begin rubbing the paper off. Try not to use your nails as this will scratch the image off the tape. As T!m says "rub til it squeaks". Make sure you get all the paper off then take out and dab some of the moisture off carefully.


This is where we say good by too this image as I killed it after the next step by trying gold leaf lol. Hello new image :) Another thing I learnt was definitely to adhere your tape to acrylic before doing anything else!  So use a small amount of glossy accents or a similar glue like diamond glaze etc on your acrylic piece and place over the image. The sticky side should be facing down and shiny side up as this is the side you add the tile to. Set aside for 30 minutes to dry and then flip the chip and image over. Carefully rub your fingers over the image to push any trapped spots of glossy out. Leave to finish drying. I used this technique to also make a smaller acrylic tile.


While that was drying I started on my background. I grabbed my Iced Spruce distress pad and covered a yellow piece of cardstock with it direct from pad to paper.


I then used the water flinging technique to add large droplets of water to my background and dried with my heat tool and then added Evergreen Bough distress stain to the edges with my ink blending tool.


I  repeated again with Festive Berries. Wow just realised I used the complete winter set on this tag :) Go me!


I grabbed a stamp I picked up for $2 at spotlight by fundamentals and my Evergreen Bough distress pad and flipped my image sideways to stamp a series of the image accross.


Off on a picture hunt seem to be missing some eep lo.. Ok sorry :( the pics MIA. So I will describe what I did next. I cut some letters with my cuttlebug using  two different fonts. I cut "Christmas" with the alphabet from the Holly Jolly giftset. I cut "Joy" from the Sizzix Sizzlits  Curls and Swirls alphabet.

I then got back to my ornament. I flipped it over and used a generous amount of Pearl Mixative and my distress tool to cover the back. Make sure to use a generous amount if you try this way or it starts to lift the image off the tape. I found the photo's Yay!


I used Multi-Medium Matte to glue down the the letters and then covered them with glossy accents. I left the "o" out as I had decided to replace it with another ornament.


I grabbed some thin red ribbon from my stash and looped some through my ornaments, leaving the tails nice and long. I made two bows, one small one larger. I adhered the bows with glossy.


I used regular tape to hold these on the back of the background so they could be pulled off and kept as ornaments and uses a small amount of repositional tape to stop then moving about too much. On reflection I would use some multi-medium or something like that  on the back of the ornaments after the alcohol ink to seal them. 


It still looked a bit plain so I grabbed a thin piece of tinsel from the christmas tree... lol. Four jump rings ,some beads and some tulle. I used beading tools and head pins on my three bead, the beads are two glass pearl 8mm beads and 1 Swarovski crystal, I createted loops and added a jump ring to each. With the last jump ring I opened it up wide and placed the tinsel inside and then added the three beads, red, crystal, red and closed it up.

I cut a thin strip of tulle, maybe 1"/2.5cm wide freehand and turned it into a bow. I glued this to the tinsel above the beads with glossy on miss 8's orders lol. And card done :).


Hope you enjoyed this tutorial.
Happy Scrappin'
Purple

12 Cards of Christmas T!m Holtz Style Card 8


So here it is my favourite so far and the most labour intensive lol. This one took a good long while but it made it here in the end :). I love steampunk but the challenge for me was to change it up by using a different colour all together and yet still somehow get that christmas feel. I spent a whole hour trying to make a stamped shrink clock that I ended up putting aside as the colour didn't work lol... Definately a challenge! My Inspiration a la T!m.


Card 8


It started with a clock. That's the main element I wanted to add to my card. The challenge was how to make something spectacular with said clock.... lol. I cut my clock from the Sizzix Weathered Clock die and set it aside and got to work on my background.

I cut white card to size and covered it in Tumbled Glass Distress Stain. i dried it with my heat tool and the misted with home made mist. The mist is made from Denim Color Wash and True Blue Pearl-Ex. I added some cling Wrap over the top and scrunched. Ok I need to learn to walk away for a while and leave it alone lol.


This was the result... Sorry about the shadow but it has the best colour lol.


I grabbed the clock and covered it in Snow Cap Paint Dabber then went over it with Tumbled Glass Distress Stain. After that dried I added some more stain to get some more colour on there.


I then grabbed my Pearl Ex in Silver and my Perfect Pearl Brush and added some more colour on to the clock. In the end I also added a smidge of Faded Jeans to the clock as well.


I tend to jump around from one place to the next when I am crafting so I grabbed my background and decided to give it a boost. I used Picket Fence Distress Stain to lighten a portion of it. I wasn't worried about the shape too much as I knew a lot would be covered over. I then took my Perfect Medium and used the pad  edge directly on the page to add some lines. I went over that with Silver Pearl-Ex.


I grabbed a stamp from Flight's of Fancy and used tumbled glass to stamp some watermark type effects onto the background. As you can see it is very feint. I decided it was to feint later and added more :O...


I then grabbed a piece of blue marbled cardstock from my stash and stamped my sentiment with a Stampers Anonymous stamp. I used Faded Jeans Distress ink and quickly tossed some Ranger Ultra Fine Embossing Powder over the top and heat set.  I then used a Lifestyle Crafts die and positioned over my stamp to try and make it even on each side. I used some Scotch Vellum Tape to hold the die in position as I ran it through the Cuttlebug.


I ran it through again with the Spellbinders Tan mat to give a little edge to custom die cut.


First up I used tumbled glass with my distress tool to edge my die cut, I then went round again and added faded jeans to the edge. On top of that in selected locations I dabbed on some silver pearl ex.


I cut a cog with my Gadget Gears die and then mixed white and Broken China Crackle paints together. I don't have tumbled glass so was the best I could do lol. Hmmm wonder if you can add reinker to white... lol. Might try that next time I need a colour I don't have....


I liberally painted my cog. I used all that paint :O, lol I thought I had made far too much, and set it aside to dry.


At this point I will say I got some shrinkies and polyshrink the other day and was playing around with them. I made a small cog with one using the medium gadget gears cog. I then used perfect medium all over and sprinkled light blue embossing powder over before heating and shrinking with my heat gun. Once it was cooled a lil I used some silver pearl ex to give some shine. Here is a pic of me trying it out on my card while the other cog was drying.


Here is where I added another layer to the background lol. Taking the same stamp as before I used my Picket Fence Distress stain direct to the stamp to add some lightness.


Once the crackled clock was dry I went over it with some denim distress ink and a make up wedge.


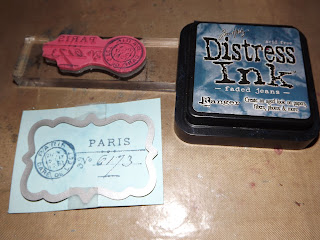
I wanted to use broken china distress pad but I don't have one. So I cut a square of Cut-n-Dry Foam and made my own temporary one til I get the pad lol. Easy peasy, Cut-n-dry and a few drops of reinker. Done! I will say don't add too much reinker a little goes a very long way... oops...


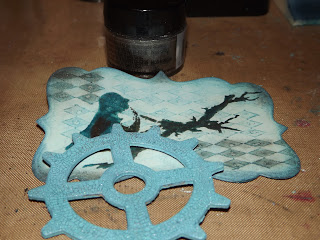
I used my custom ink pad to stamp a bird image and then embossed again with the super fine. I used a bigger lifestyle crafts die to fit around the bird. Again I used the spellbinders tan mat to emboss after I cut the shape. I stamped the diamond pattern using the custom pad. I stamped multiple times with the one inking to give the lighter effects.

I went around the edge with broken china and faded jeans. I then used mink pearl ex on the tree branch and added some blue russet pearl ex to the bird for a wing and to his belly as well for a christmassy look. I used a permanent marker to add a little eye.


I then grabbed that piece and the crackle cog from earlier and added some silver pearl ex around the edge of the die cut and all over the cog to give it some shimmer :)


I then spent aan hour making shrink clocks, til I made a perfect one... That I didn't end up using because it just didn't suit the card! That's ok it will find a home somewhere one day!

So then I cut a large cog out of shrinkies and shrunk it down with my heat tool. I went over it with perfect medium and then silver pearl-ex. I found the pointy tweezers in the pic on ebay in the nail art section. they are brilliant for bling and holding stuff when your heating! lol Love em!


Again I had another element I really wanted to put on this card but it wouldn't go lol...


Clean it off set it aside for another time... I should add that I found on the way to getting  my daughter off the bus one day...

So then I grabbed some more of that gorgeous blue marbled cardstock and stamped a Christmas sentiment on there in tubmbled glass, threw some embossing powder over the top and embossed it :). Using the same method as before I positioned in a lifestyle crafts die and taped it down and ran it through the bug to cut and emboss. I then edged it with broken china and faded jeans.


Almost there... Phew this is a long one hey? lol...

Ok next up I decided I wanted to take it to the next level so I grabbed the bird die cut shape and flipped it over. I used a lil' davis journalling stamp on the back, then used my crop-a-dile to cut a hole and add a pale blue eyelet. I added a little bit of irridescent blue ribbon through the eyelet and turned my die cut into a tag :)


So here is where it got tricky. I had to work out how to position everything and stick things so that the tag would slide in and out easily enough. As I was working things out I decided to use the extra piece of the clock  for two reasons. The first was as an added accent. the second was to make it easier for the element I was placing there. I glued the clocks on with glossy accents making sure that there was plenty of room for the tag to slide in and out.


I then started playing about with the elements to get them where I wanted them.. I used a combo of glossy accents and foam squares to add the elements depending on where they would be placed. For the large cog I was careful to only place tape on the left side so the tag could slide under.

A pic of card and tag together. Card still looks pretty good without it...


And the finished card :) Yay! This one took a lot of thought and effort and trying things til it gelled.


Hope you all like this card as much as I do. I have finished all 12 cards now and it is still my fave!
Thanks for stopping bye.
Happy Scrappin'
Purple