blinkie

CraftyCrafter

Sunday, 1 September 2013

Journal Page with Gelato's, Quickutz and Copics

 So I finalllly did another page in my Journal lol. Our Dt Challenge for the Purple team this fortnight is make the sentiment/saying the main focus of your project. Being an Aussie (pronounced like Ozzie), I have always adored Dorothea McKellar's My Country (click the link to read full poem). So that is what inspired this page :)
 First up I took brown and green Faber-Castell Gelatos and scribbled them randomly on the bottom half of my Journal page. As you can see I only used a hint of Green. The area I am depicting is a very dry and harsh part of central Australia. I then used blues and whites to do the sky. I used a waterbrush to soften and bled the colours together. Adding more colour as needed and blending that in.
 Unfortunately my printer has decided to give up the ghost so I had to ask my friend to print this, my favourite verse out for me.  I then cut each line into its own section with my KaiserCraft Cutter.
"I love a sunburnt country,
A land of sweeping plains,
Of rugged mountain ranges,
Of droughts and flooding rains,
I love her far horizons,
I love her jewel-sea,
Her beauty and her terror--
The wide brown land for me!"
 
 I used the Tim Holtz Core'dinations Distress CS pad to cut Uluru and some greenery using a Quickutz die from the Australia set. Love this set it also has Sydney Tower (I still call it Centrepoint in my head lol), a Koala and Kangaro, a slouch hat, a boomerang and the Aussie flag :) I love cutting with my ebosser :)
 After cutting the images I gave them a little sand and added some distress inks. Rusty Hinge for Uluru and Crushed Olive for the greenery.
I then decided I wanted to add some gradiated colour to the word strips with blue and green copics. I started with the darkest blue I wanted to use and worked to the lightest, then from he lightest green to the darkest. I am hoping the greens look a little better when they finish drying lol.
After adhering them to the page with tape ( I used a snail type and it wanted to rip the backs off the cs... That was fun lol ) I took a Distress Marker and added dashes around the word strips. I am thinking of adding some of those lil m shaped birds but am scared I will wreck it hehe. My handwriting and drawing is very bad lol.

Not only is my printer broken but so is my camera. At first the whole thing was wiggy but I reset it to factory defaults and most of it seems OK now except my HD video. It will take standard video but it's poor quality lol. Oh and I keep losing things. I have three rolls of tape on the go. . . Think I can find any?
Anyways Happy Scrappin'
Purple

Saturday, 17 August 2013

Painting The Roses Red with My New Copics!

So I was looking into getting alcohol markers . I bought some Promarkers and I really liked them so I bought another set (vivid and set 1) . The only problem was I didn't have many blendable colours . Then I bought a set of 30 old Trias someone was selling. This gave me a few pastel colours and some skin colours and also 30 fine nibs that also work on the Promarkers . I really love the streakless colouring. I have faber castells and could never get them to not streak so don't know what I was doing wrong! Anyway to cut this long story short I frequent ebay quite a bit and came across a seller in France who was selling a complete set of  Ciaos and Wides with a couple of sketches thrown in. They are barely used (they said they did 2 pictures) and still nice and juicy. So with my heart in my chest and waiting til the last minute to bid I nabbed them for less than 1/3 of the rrp :) Bargain lol. Then for my birthday a friend bought me the case for them :) All my copics and promarkers fit in it nicely at this stage although I am not sure if I will keep all the wides. Will see how I feel a bit down the track.
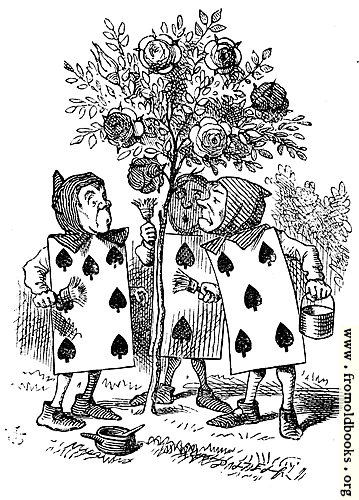
Anyway now that I am finished rambling about that I get to tell you that this weeks project for Eclectic Ellapu needs to contain playing cards :). So I scoured the net for an image I could use. I fell in love with one but thought $4 might be a lil much for a digi when you can get rubber for that price. So I kept looking. Originally I thought maybe I would do the Queen of Hearts from Alice in Wonderland but then I found some Free images at From Old Books. That links takes you directly to the page with the image I used but there are many many more :)
So now I have coloured this with a combination of copics and promarkers and am using an Xcut Ornate Frame die to cut it out in my Ebosser. Here is a list of colours I have used:
Roses, paintbrushes and Card 2; R27,  R29, E40, E41
Card 5; R59, RV69
Card 7; Promarkers Olive and Pear Green
Stockings;  E35, E33
Faces; E00, E01, E02, E93 (cheeks)
Tree; G99, G95, YG95
Grass and bush; YG63 YG67, Olive Green, G94, G28, YG91
Shadows on all cards; C5, C2, C0
Paint pots; C5, C3, Y21
Next I grabbed Cosmo Crickets 6"  Odds & Ends stack. I grabbed two co-ordinating pieces. The green stripey piece, the coloured image and the piece for iside the card were all cut using Xcuts Ornate Frames. I edged them with R29.
For the cream floral piece I used a Martha Stewart corner punch and my B000 for the edges. Argh my kitty is trying to help me type lol.
Next up I grabbed my Tim Holtz Tattered Banners Sizzix die to cut two banners the same size. I used white cs which I coloured with R29 to match the rest of the card.  The sentiments were printed out at the same time as the images. I cut around them then coloured them with B000, there was still some R29 on my fingers and it came off on the first one I coloured so I decided I best put some on the other one as well so they matched :). I added two layers of foam tape behind the middle of each banner after I taped the sentiments on.
For my base I used cream cs that I edged with R29 again. I used double sided tape to add my Cosmo Cricket papers and then a single layer of foam tape on my image. I then added the banners. I was in two minds as to whether or not to add flowers or not. But as you can see I have left it for now :)
Below are a couple of images I have coloured with my copics since I got them.
Not very good at hair yet that's why she isn't finished. I attempted hair on the second one as you can see :) also a mouth... Shoulda left it but live n learn hey?
The second picture here shows three different card stocks. Neenah Solar White and two I got from officeworks here in Australia. I have to say the cheaper two cardstocks performed way better than I thought they would. When I pull some more paper for my cupboard I will do a post on it and let you know the names of the brands :).
Thanks for Stopping by.
Happy Scrappin'
Purple

I am entering this at;
Simon Says Stamp - Die Cuts

Saturday, 3 August 2013

Something For Teacher With Sandylion Stickers

I thought I would try for a more CAS project this week and I had the perfect stickers for the theme. The only trouble I had was finding a table svg so I found this free file here and imported it into SCAL 3. As it would have cut all those lines I made a shadow layer and cut that out instead. I used a white cs base with a very light cream matte on top of that. Anything darker made the table fade into the background. The stickers are all from Sandlylion and have foam dots behind them already to pop them off the card.You can see the shadows from them being raised off the card below.
Both the table and the blackboard background are cut from a brown batik paper that I thought would work well as wood :). I used Lifestyle Crafts nesting squares to cut the table and blackboard background. I stamped a Thank You from an Inkadinkado set with Cotton White Opaque Stazon. I added a square of cs under the batik layer of the blackboard to reinforce it so I could add some very thin foam tape underneath. The twine is from hemptique

The best bit is I have enough stickers left in this set to make a girly back to school or graduation card :) I hope you like my more simplified project this week for Eclectic Ellapu !
Happy Scrappin'
Purple

PS sorry I have been so absent of late! I have had a whole lot going on plus I just got alcohol markers and have been busy learning a whole new skill set. I started with promarkers and trias, then I got lucky and someone was selling an almost complete set of Ciao's on ebay that got here on Tuesday. I have been colouring up a storm! Need to make use of some of those images so I can show you!

Friday, 19 July 2013

Purple Tattered Angel Butterfly Canvas

Hi everyone :) This week it's my turn to host the Eclectic Ellapu challenge. My challenge is shades of PURPLE with the main focus being butterflies. I would also like to see one of the following, brads buttons or bling. Bling can take the form of anything from shimmer mists to rhinestones and anything in between :)
I started by grabbing my purple distress supplies. I used Milled Lavender, Shaded Lilac, Dusty Concord and Seedless Preserves in both stain form and ink pads. I also used Brushed Pewter Distress Stain for some sparkle. Onto some watercolour paper I used Royal Purple Stazon to stamp my Tattered Angels In Flight Butterfly. I used a distress stain bottle to shape the wings.

I then used the stains on my craft mat with a spritz of water to colour the butterflies with my Tim Holtz waterbrush . The lightest colour is milled lavender, the middle colour is dusty concord and the outer colour is seedless preerves. I used my gathered twigs ink pad to colour the butterfly bodies.
For the canvas I laid down my five stains randomly and then spritzed with water. I used paper towel to blot the excess and lighten the background up a bit. The paper towel helped to give a nice texture as well. I then used dusty concord and seedless preserves around the edges.
I then used the butterfly stencil from Tattered Angels Fanciful Stencils and a sponge dauber with milled lavender and inked the inside parts of the stencil. I then used the stamp again with the milled lavender to stamp over each butterfly. I wasn't looking to line things up perfectly, just to add a bit of interest to the background.
I used See Dee's Monarch stamps over the background. For the large flourish I started with my lightest colour at the top (lilac) then added dusty to the middle and seedless at the bottom (worked lightest to darkest). I then stamped some of the butterflies with seedless.
I used a home made glimmer glaze all over the butterflies for some serious sparkle. It consists of iridescent medium, triple thick and a little water.If you ever need more sparkle try some iridescent medium! Love that stuff. I then did two coats of triple thick over them and left them to dry for 24hrs.
I used some beading wire and 2 or 3mm Miracle Beads to make antennae for my butterflies. I used some tape to hold them on the back. I added some rhinestones to the butterfly wings and some dangly butterfly charms from the body. The charms were coloured with promarkers and copics.
I wanted to add words but have hit a brick wall lol . . . I know where I want to add them but am not sure if it will ruin the piece or even really how to add them in so they don't. For now I am leaving as is and if I get a brainwave I will add them if not, well I guess it's done lol.
Hope you enjoyed another canvas. Next week will be something different, promise!
Happy Scrappin'
Purple
I had to add this pic so you could see how the iridescent medium sparkles! It doesn't show up so much in the other pics. You can also see a lil of the sparkle on the canvas itself from the brushed pewter stain . . .

Saturday, 6 July 2013

First Finished Mixed Media Canvas With Loads of Idea'ology Part 2

Well this weeks challenge for the purple team at Eclectic Ellapu is It's a Mans World . . . So I finally pulled out all the bits and pieces I have been collecting plus a few more (like the buttons) and sat down and finished my first mixed media canvas.
I started this a while ago, here's the link to the original post for the base. I played and played and just couldn't get it to gel the way I wanted an packed everything up. But I needed something manly for this weeks challenge and as I haven't been feeling the best I was a bit short on ideas . . .
So grabbed this and decided tonight was the night it got finished! As you can see there are Tim Holtz Ideo'logy pieces by the boatload, wings, accoutrements, game spinners, cogs and gears, mini cogs and gears, the lock and key, word band and muse token. Oh and of course the mini film strip, it's the first project I have used it on and was one of the first things I knew was going on this canvas. Love that stuff :)
The playing cards are from Kaisercrafts Sears & Son range. A poker chip I coloured with a brown Sharpie. There is a domino and mini word (dream) that I inked with brown alcohol inks. There is some Hampton Art twine in brown tying on the word band. I am not sure where the time word came from I just know although it's thick it is super light (have a set of words like this?) and a random playing card charm.
I made this for my man who happens to like playing poker, hence the playing cards and poker chip. He also like steam punky type things (good thing I like steam punk and have been collecting). It was supposed to be finished a long time ago but better late then never right?
All dies are Sizzix Tim Holtz dies, weathered clock, cogs and gears, mini cogs and the cog boarder and have all been cut with either grungepaper or grungeboard. Around the edges you can also see some well inked tissue tape :)
I hope you enjoyed my first canvas.
Happy Scrappin'
Purple